Believe it or not, expert Minecraft users often run into system memory errors requiring them to allocate more RAM to Minecraft. With all of the different things that can be done within Minecraft, some creations could cause the game to become unstable and crash. Allocating more system RAM to Minecraft is a simple fix to prevent this.
Minecraft is possibly one of the greatest video games ever made. Probably the digital embodiment of Legos, Minecraft is the ultimate digital sandbox. Kids and adults have crafted innumerable structures, artwork, vehicles, and more that take a lot of time, dedication, and creativity to complete. So if you are wondering how to allocate more RAM to Minecraft then keep reading on
Determine Your PC’s Total RAM
In order to allocate more RAM to Minecraft, the first step is to see how much RAM your computer has to work with. As a general recommendation, it is not good to allocate more than about two-thirds of your PC’s total RAM to Minecraft. This will allow your computer to still have memory to perform other actions and prevent errors from occurring as you play.
To check your memory in Windows, go to the START menu and pull up the SETTINGS menu by clicking on the GEAR. Once you are in the SETTINGS menu, click on the SYSTEM menu and then click ABOUT. You can then see your computer’s total INSTALLED MEMORY (RAM).
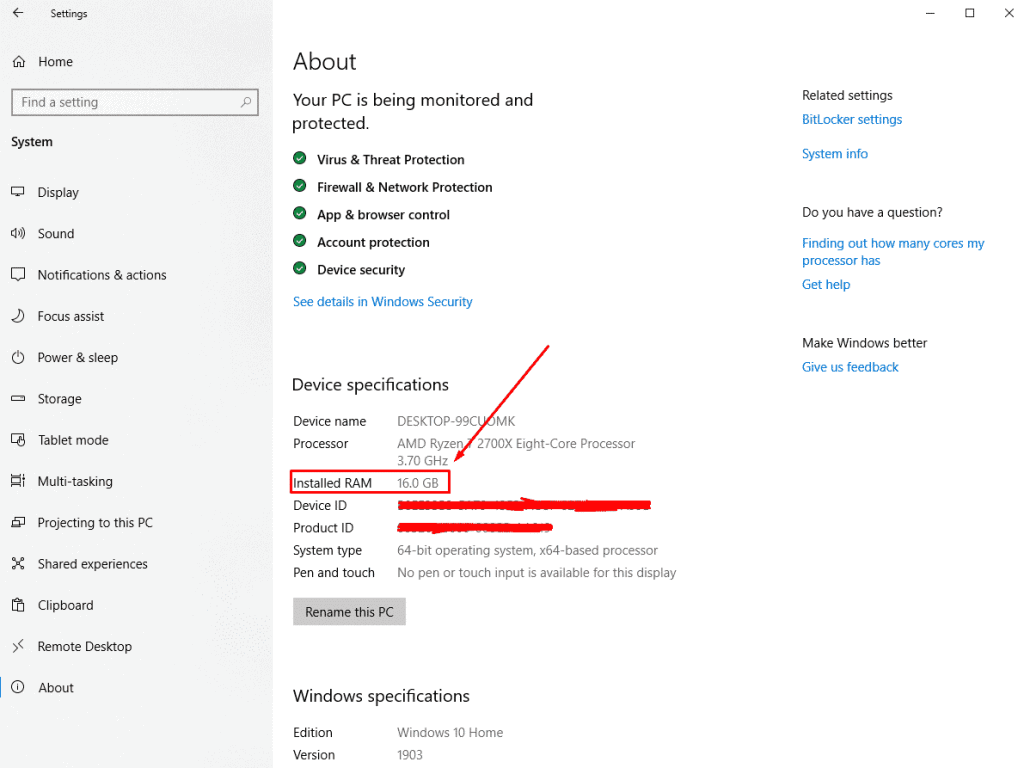
One thing that most people don’t realize is that if you have a 32-bit operating system, then your computer will only be able to recognize and utilize 4 gigs of RAM. Even if you have physically installed more RAM on your motherboard, the operating system won’t be able to use the additional RAM.
If you do have a 64-bit operating system then you are able to utilize more RAM. It has been found that for most advanced users of Minecraft, though, that 4 gigs of RAM is probably the most one will ever need to run Minecraft with high graphical performance. However, if you do allocate that much memory and your computer runs slower, press CTRL+SHIFT+ESCAPE and use the TASK MANAGER DETAILS tab. There you will see what programs are running in the background and using RAM.
Determine Your Minecraft Launcher Version
Since there are a few different ways to allocate more RAM to Minecraft, you must know what Minecraft Launcher version you have. To keep things simple, we will cover the steps needed to do so with a recent (Minecraft Launcher version 2.0.x and beyond) version of the Minecraft Launcher.
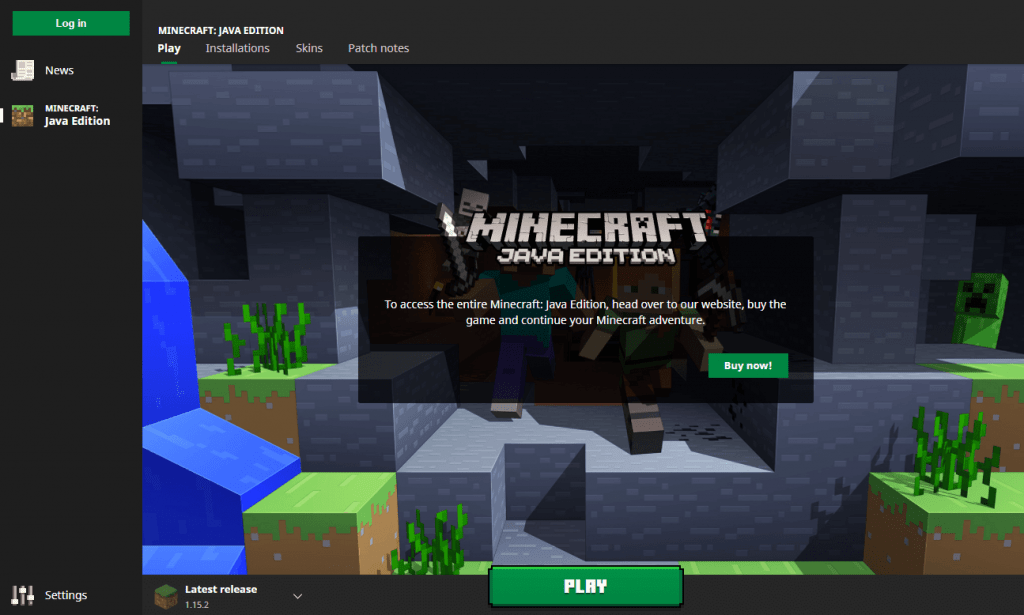
The Minecraft Launcher app basically lets you load different versions of the Minecraft game. This allows you to take advantage of different builds of the game complete with past glitches, balances, and content updates.
Find the Minecraft Launcher app in your START menu and launch it. Once it loads up, you will see the Minecraft Launcher screen. Somewhere on that screen, you should be able to see the version of the launcher. If it is not up to date, go ahead and update the Minecraft Launcher. Once the app updates, go ahead and relaunch your updated Minecraft Launcher app.
Use Minecraft Launcher To Allocate More RAM To Minecraft
Once you are in the updated Minecraft Launcher app, you are ready to allocate more RAM to Minecraft.
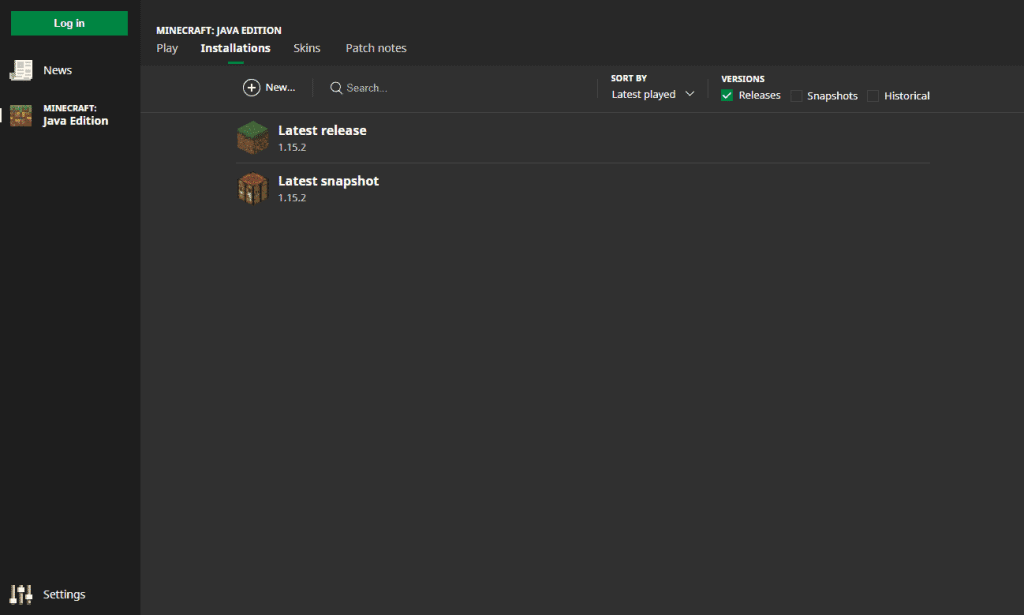
In the initial Minecraft Launcher App screen, find the INSTALLATIONS tab at the top of the launcher screen and click on it.
Click on the profile that you want to change. This should bring up an EDIT INSTALLATIONS screen.
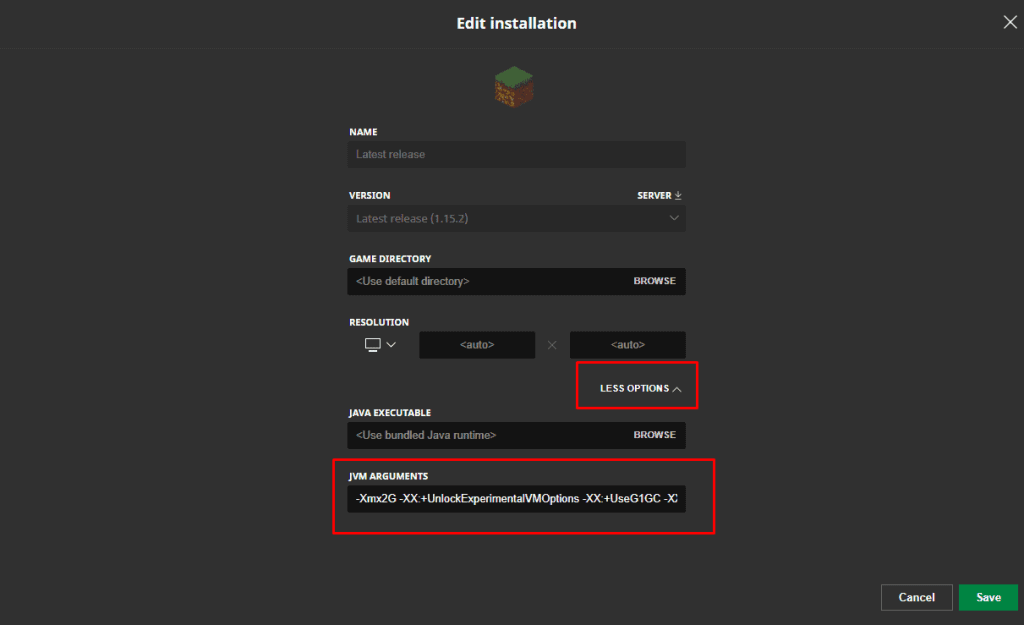
Once in the EDIT INSTALLATIONS screen, be certain that the JVM ARGUMENTS box is enabled. Click on it to begin writing commands.
In the JVM ARGUMENTS box, you will see a line of text that says -Xmx1G. This command basically tells your computer to allocate one gigabyte (or 1G) to the operation of Minecraft. To allocate more RAM to Minecraft, you will need to change the number in this line of text.
For example, to allocate two gigabytes of RAM to Minecraft, change the command in the JVM ARGUMENTS box to read -Xmx2G. To allocate three gigabytes of RAM to Minecraft, change the command to read -Xmx3G.
Once the change has been made, be certain to click the SAVE button at the bottom of the EDIT INSTALLATIONS screen. This will enable the change for this profile.
Using Minecraft Server Method
Some users make their own PC available for other players to play Minecraft on. Just like a server, Minecraft can be made to play online with a number of users. This method requires you to allocate additional RAM to be able to handle the additional players that will logon to the PC or server. It is recommended that at least 3 gigs of RAM are allocated to Minecraft in order to handle the additional processing from multiple online users.
If you go to the folder where your Minecraft Installer is launched from you will find a subfolder called “Minecraft Server”.
Right-click your mouse on an open space in the folder window and go to the ‘NEW’ command and then the ‘TEXT DOCUMENT’ command. This allows you to create a new document within the Minecraft Server folder that you just opened.
Enter the following code in the text document:
Java -XmX####M -Xms####M -exe Minecraft_Server.exe -o true
PAUSE
In the part of the code with ‘####’, place the valuve in megabytes that you want to allocate to Minecraft. To allocate 2 gigabytes, place ‘2048’ where ‘####’ is in the code. To allocate 3 gigabytes, use ‘3072’. To allocate 4 gigabytes, use ‘4096’. To allocate 5 gigabytes, use ‘5120’.
Once you are done, click FILE and select SAVE AS. Rename the file to MC Server launcher.bat. In the SAVE AS TYPE box, make certain to change the file extension from “.txt” to “.bat”.
This new MC SERVER LAUNCHER.bat file then becomes the new launcher for your Minecraft server and will allocate more RAM to your Minecraft Server.
Again, allocating more RAM to Minecraft will allow the game to run smoother when you are building large and complex creations within the game. To change back to the default amount of RAM, either go through the steps listed above once again, or create a new profile.

