
Do you know the special features of Chromebooks? They are lite netbooks meant to make your work life easier. The devices run on Chrome OS and they are sold by Google. Chromebooks are certified types of netbook laptops that Google must certify to run the Chrome OS. If you get a Chromebook, you will find that your work is easier because you can boot and connect to the internet immediately and start working.
You, therefore, realize that Chromebooks do not need lots of resources and storage on your device. All your work is saved on Google Drive and you can make your conversations online through Gmail. In short, Chrome OS is an “extended version of Google Chrome” that is converted into a complete operating system to boot from.
Even though the OS seems to be too basic, you can achieve a lot with old PCs that cannot run modern OSes smoothly without lagging. It also adds fancy to your machine. The advantage of using a multiboot is that you will enjoy the Chrome OS and still switch back to your Windows 10 desktop to accomplish tasks that entirely require the use of Windows.
In this post, you will learn the steps to follow in order to run Chrome OS on your laptop. Take note that this is for educational purposes only. In case you miss a point or take a wrong action, you may render your machine useless or lose your important data.
Since we are offering this tutorial for people who want to test out their systems, we do not guarantee any success in the steps or the whole process. We do not offer any support for the systems and we will not accept any liability for any damages or losses you may incur for following the tutorial.
Why You Should Multiboot Chrome OS with Windows and Linux
According to Androidcentral, you can do many things with a Chromebook, and they are faster than Windows computers. It is, therefore, ideal to get yourself one. But in case you do not have a budget for it, you can simply convert your Windows 10 PC into a Chromebook with a free open source OS.
With multibooting, you get the advantage to go back to your favorite OS to complete the tasks and schedules that you have set on your machine. If you have been using Windows, you will have the opportunity to switch back and forth and saving your progress between sessions.
Linux is also essential when it comes to Multibooting. The default Windows loader does not recognize other operating systems installed on a computer. In this tutorial, we will be using Ubuntu as our Linux choice because it is famous and comes with built-in GRUB 2, which is necessary for multibooting systems.
What You Need to Create a Chromebook-like PC
The simple tools you need for a successful installation of the system include:
- A laptop/netbook with spare storage.
- A flash drive (at least 8GiB).
- Chromium OS disk image.
- WiFi Network.
Steps to Follow When Making Your Own “Chromebook”
As you already know, the official Chrome OS that comes with Chromebooks is not available for download. But we have two options. You can either install Chromium OS, which is the open source version where Chrome OS is derived from or use CloudReady. The latter is an unofficial modified version of Chromium that comes with more features and compatibility. However, it does not support many systems yet.
Before we proceed, you may want to install Ubuntu Linux on your Windows PC if you have not done so. This will allow you to modify the boot menu after you are through with the installation of Chromium OS. Once your system can dual boot Ubuntu and Windows, you are ready to install Chromium OS.
1. Create Required Partitions on Your HDD
Before you can install Chromium OS on your HDD, you need to have sufficient space to hold the operating system and any other files you may save on your computer. To do so, use a Linux “Live USB” to boot your computer for easier management of your HDD.
Please note that the partitions you require for Chromium OS are different from those you used to install Ubuntu Linux from the link above. Each operating system will need to run from its own partition. You may want to create an extended partition to accommodate more partitions under the MBR systems.
Once you are logged in to the Ubuntu “Live” environment, launch Gparted (the Gnome Partition Editor). Select the internal HDD that you want to install the OS on. In most cases, this is shown as /dev/sda. But be sure that it is the right disk. In case you are not sure, unplug all external disks and refresh the editor.
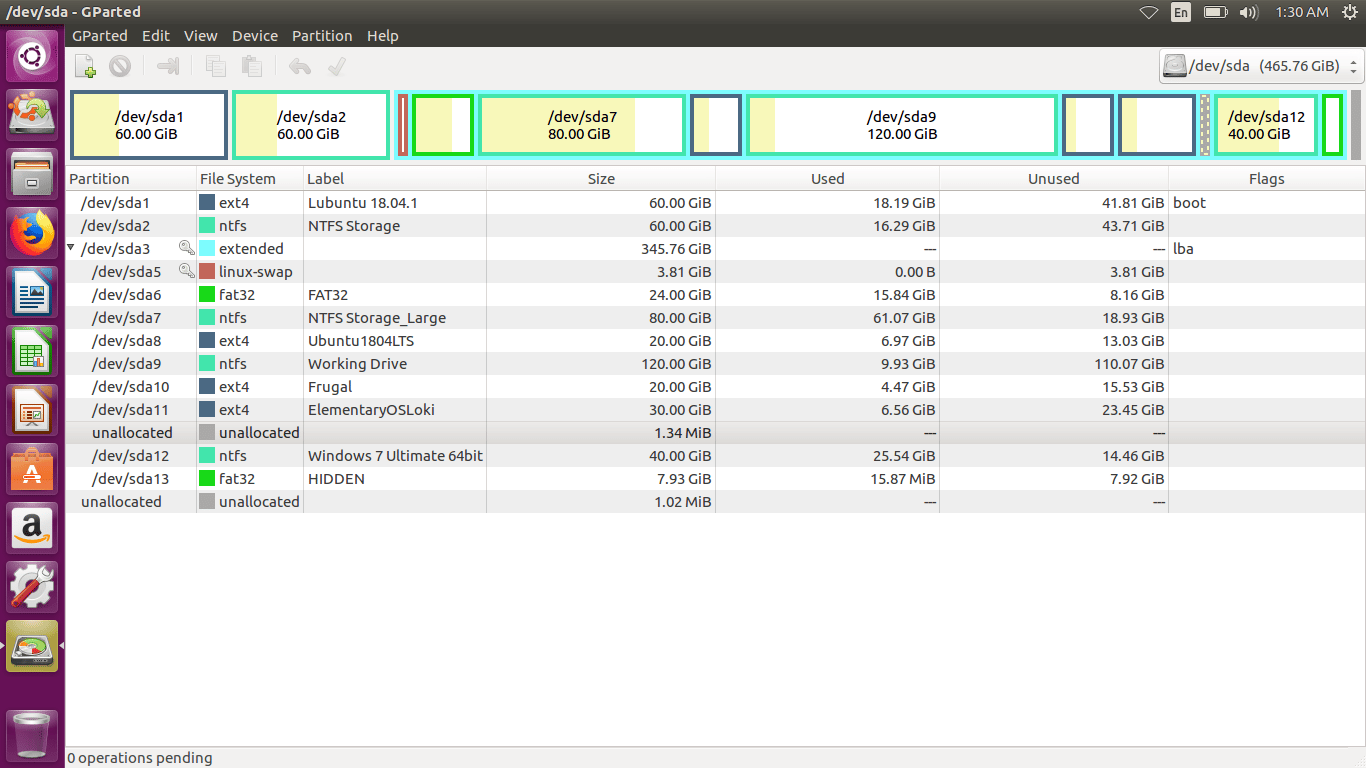
If you do not have unallocated space on your hard disk, you will start by shrinking available partitions to create space for new OS installations. When you must move the Windows and Linux boot partitions, you should refer to the Gparted FAQ on how to fix any arising boot errors. But this should not cause any serious problems on your PC.
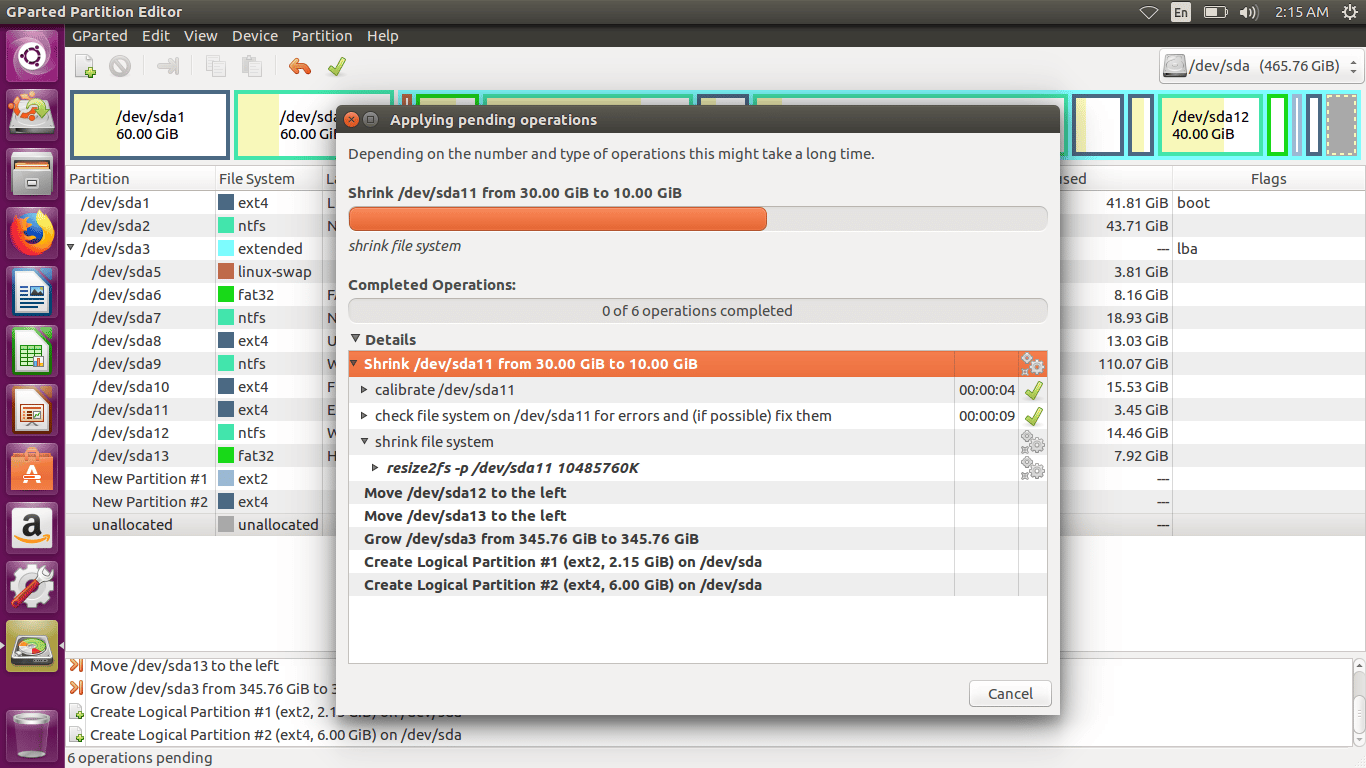
Once you have sufficient space on the disk, create two partitions. These should be 2.15GiB (make it EXT2) and 6GiB or more (EXT4). These are the partitions that you need to install Chromium OS. The process of moving partitions may take some time. You can continue with another task for several minutes (depending on the disk size you are editing).
2. Download and “Burn” the Chromium OS Image
Before you install Chromium OS on your laptop, you need to boot it. This is possible by grabbing a bootable image and “installing” it on your USB disk. This is not a conventional ISO that you can burn on any DVD from a ROM. It is recommended that you download the “special” builds that have more drivers to fit your laptop features.
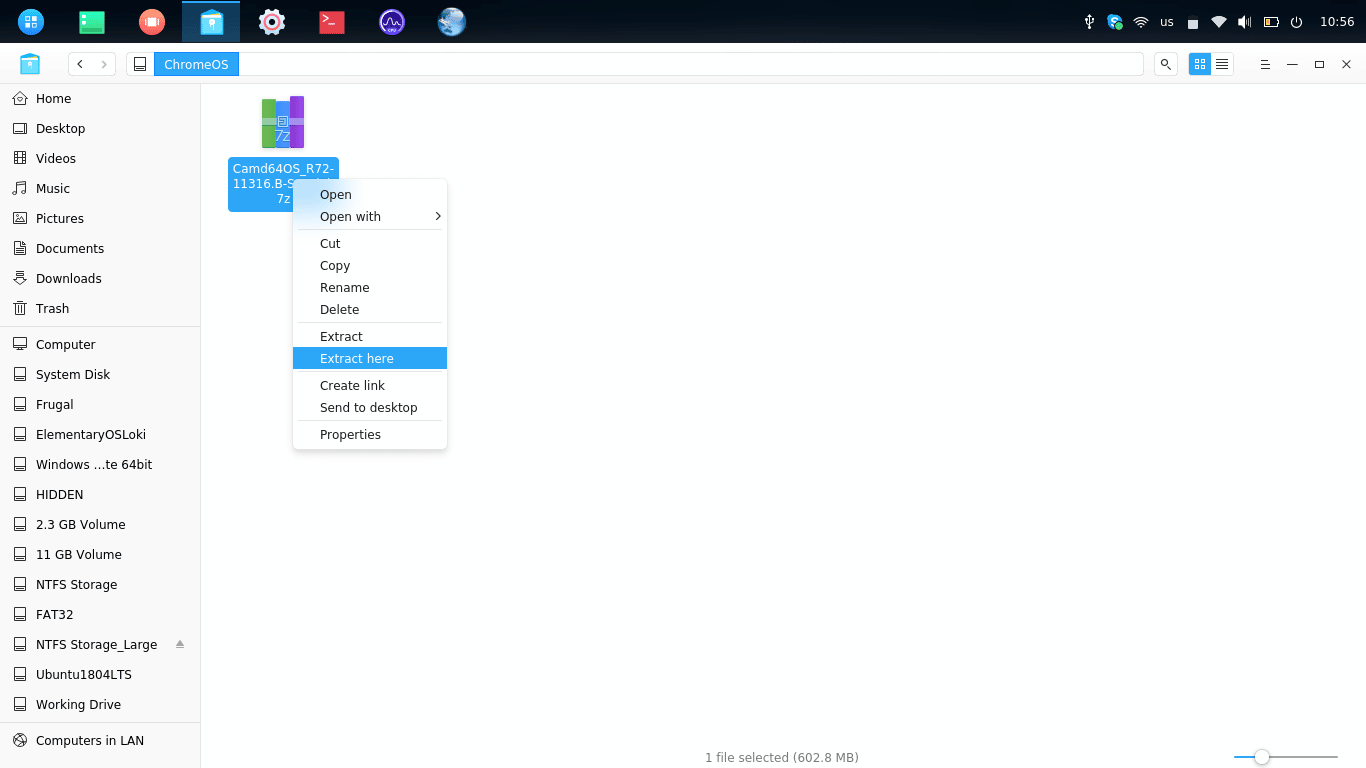
You will need to extract the image you have downloaded before installing it on your flash drive. It is recommended that you use 7zip to extract the file either on Windows or Linux (sudo apt install p7zip-desktop). If you are using Deepin Desktop Environment, then you simply right-click the file and select the “extract” option.
But for the purpose of this tutorial, we will do everything on Ubuntu Linux because we need it for the multiboot menu on GRUB 2. All derivatives of Ubuntu will also work with the steps.
With your image extracted to your computer, take your flash disk and backup all the content. This step is very essential because you will overwrite your data beyond recovery. From a Linux system, check with Gparted or fdisk. Now use the dd command line utility to write the image to your flash disk. If you are not logged in as “root”, use the sudo command.
sudo dd if=/path/to/extracted/ChromiumOS_image.img of=/dev/sdb
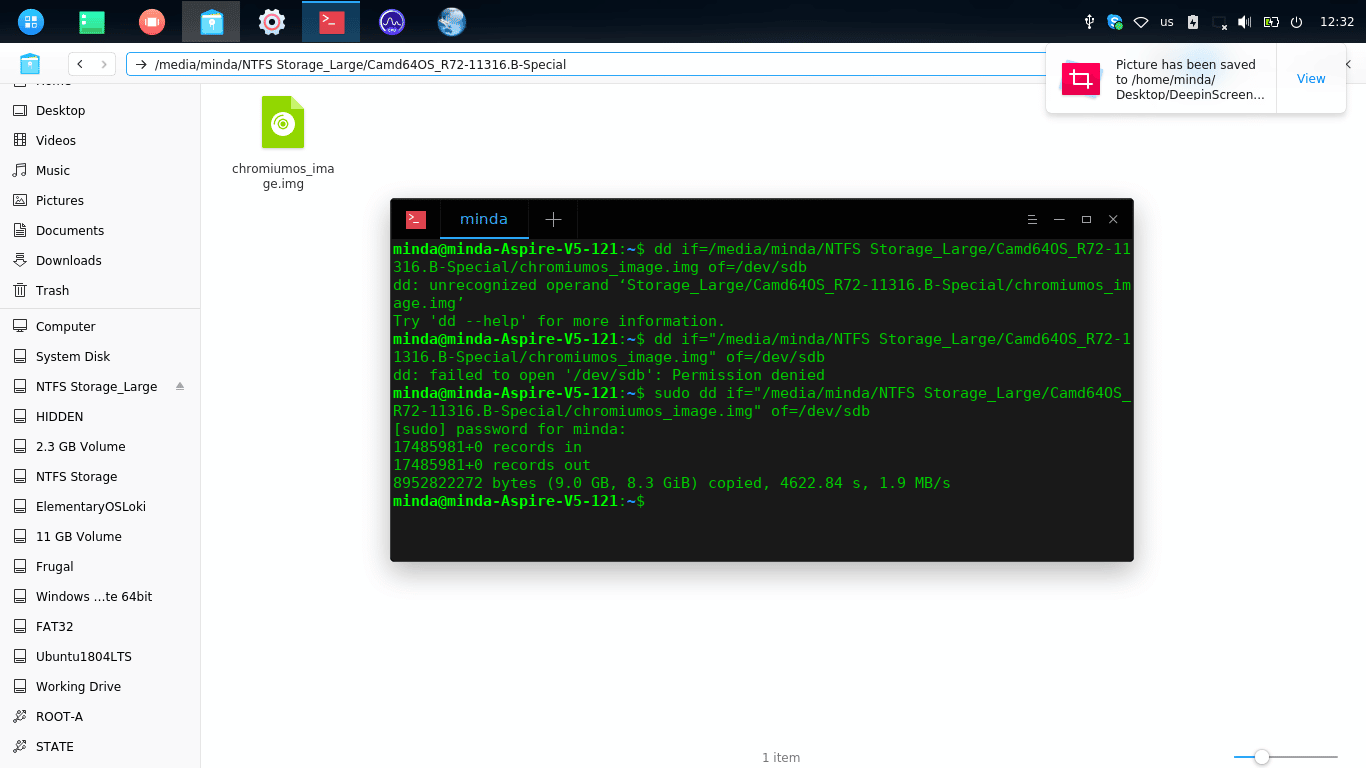
Wait until the dd utility responds with a success message. Do not cancel the process. If your image path (folder names) contain spaces, please use quotation marks to specify the location, eg. sudo dd if=”path to/downloaded image/file with spaces/image_name.img”. The disk can now boot into Chromium OS. If you have EFI machines, enable the Legacy (BIOS) boot option.
3. Install the OS on Your Machine
Up to this point, you can play around with Chromium OS from a USB. But for full functionality and long-term usage, you need a complete installation. After all, the post was about multibooting, and we need to install it on the hard disk. This step does not require you to boot from the disk you just created.
Use Gparted again to check the partitions created on the USB flash disk when installing the image. It may contain several partitions but look for the two main ones that we need – the ROOT-A and STATE (They are labeled already). We should clone these partitions on the hard disk so that we may boot Chromium OS on the PC.
ROOT-A is the partition that contains the boot items and rules while STATE is the storage drive. In the future, the STATE partition may fill up, and it is recommended that you make a larger partition for the same. Again, using the dd utility, copy the partitions to your HDD, e.g.
dd if=/dev/sdb3 of=/dev/sda14

dd  if=/dev/sdb1 of=/dev/sda15
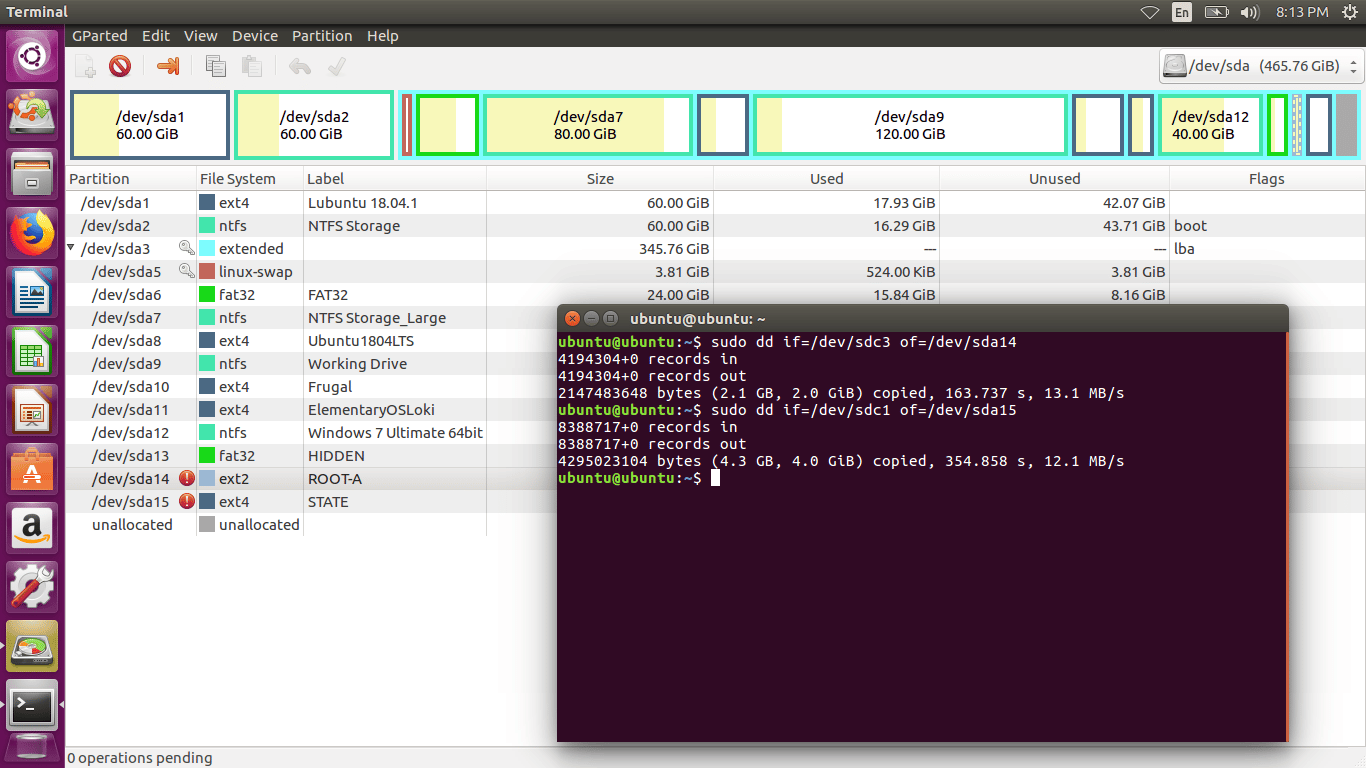
Please perform the steps above from a Linux Live environment. This will allow you to access both disks without errors. It means that your computer should support at least two USB drives at the same time. You can also use Gparted to copy and paste the important partitions from one disk to another.
4. Make Necessary Adjustments
Conventionally, the Chromium OS would expect that the STATE partition is /dev/sda1. As you can see, in my case, it is /dev/sda15. Before the OS can boot, I need to adjust the appropriate parameters so that it can read the partition from the correct location.
Mount the partition you assigned for ROOT-A and locate the file /sbin/chromeos_startup. Edit the file with any text editor and change the line: STATE_DEV=${ROOTDEV_TYPE}1 to change the last character to match your partition number. In my case, this will be 15 instead of 1.
Another thing is that by default, Chromium OS expects an OEM partition. But since we do not have this (and it is unnecessary), we need to edit another line to stop the system from looking for the partition. In the same file we edited earlier, find the line with this content and comment it out.
mount -n -t ${FS_FORMAT_OEM} -o ${OEM_FLAGS} ${OEM_DEV} /usr/share/oem
5. Create Menu Entry On the Bootloader
For you to boot the OS you just installed, you should add it to the boot menu so that you can switch between the OSes you have on your system. In GRUB2 (The default bootloader in Ubuntu Linux) you should edit the file /etc/grub.d/40_custom. Add the following content and update Grub.
menuentry "Chromium OS" {

insmod part_gpt

insmod ext2

set root=(hd0,gpt14)

linux /boot/vmlinuz root=/dev/sda14 init=/sbin/init rootwait rw noresume console=tty2 i915.modeset=1 loglevel=1 quiet noinitrd tpm_tis.force=1

}
The code above will help you to select the Chromium OS on the multiboot menu from an EFI machine that uses GPT. If you are using an old computer that has only a BIOS system, then you need to edit a few things in the code before you update Grub. (But when I updated Grub on my Lubuntu !8.04.1, it was able to detect the OS an named it “Unknown Linux”).
First of all, remove the line “insmod part_gpt” which specifies the partition table. Also edit the line “set root=(hd0,gpt14)” to “set root=(hd0,14)” to match the BIOS partition naming convention. Once you are through, you can reboot your system and ensure it boots from the HDD. You will now see “Chromium OS” as a boot option on Grub.
The Bottomline
Installing Chromium OS as a way of turning your PC into a Chromebook may encounter some issues. Not all the features are supported on all systems. Your installation may be successful but that of your friend may fail. If you think that you should get a Chromebook, then we advise that you buy one if the steps above fail on your intended device.
But if you have more devices, you can try installing the system on all of them until you succeed to get a system that can accomplish your mission. If you have any questions, you are welcome to ask in the comments section below. But as we mentioned earlier on, we do not provide support for any computer systems or offer customized installations.