A DNS server contributes a lot in simplifying internet browsing more than you can ever imagine. Basically, all sites on the web would have a unique IP Address which are consists of complex numbers that are very hard to memorize.
However, thanks to the DNS server, we are able to use domain names like google.com instead of IP Address when navigating through various websites. In context, DNS servers function like a phone directory that associates domain names of sites to their designated IP addresses.
DNS server is an integral part of the internet and if it decides to malfunction you won’t be able to browse the web.
Sadly, there have been reports from several Windows 10 users who are experiencing an issue with their DNS server.
If you are seeing a “DNS Server Not Responding” error on Windows 10 there could be a problem with your ISP’s DNS server or you have several system settings on Windows 10 that are not configured properly.
Whatever the case is, we are here to help you out!
Today, we are going to show you a few methods on how to fix the “DNS Server Not Responding” error on Windows 10.
Let’s get started.
How to Fix DNS Server Not Responding on Windows 10.
Below are several methods that you can easily follow to try and fix the problem with Windows 10 DNS server not responding.
- 1. Set the DNS Server Manually.
- 2. Manually Setup Your Mac Address.
- 3. Reinstall Your Network Drivers.
- 4. Clear Your DNS Cache.
- 5. Restart Your Router.
- 6. Disable Internet Protocol Version 6 (IPv6).
- 7. Turn Off Microsoft Virtual Wi-Fi Adapter.
- 8. Disable Unused Adapters.
- 9. Update Windows 10.
- 10. Execute Netsh Command.
- 11. Use Another Browser.
- 12. Disable Windows Defender Firewall.
1. Set the DNS Server Manually.
By default, Windows 10 would use your ISP’s DNS server every time you access a website on your browser. However, it is possible that your default DNS server could be down as of the moment.
In this case, you can use other DNS servers available like Open DNS and Google’s own DNS server.
- On your keyboard, press and hold the Windows key + X to open the Quick Access Menu.
- After that, click on Network Connections.

- Inside Network Connection Status, click on Change Adapter Options.

- Now, right-click on your current Network Adapter and select Properties.
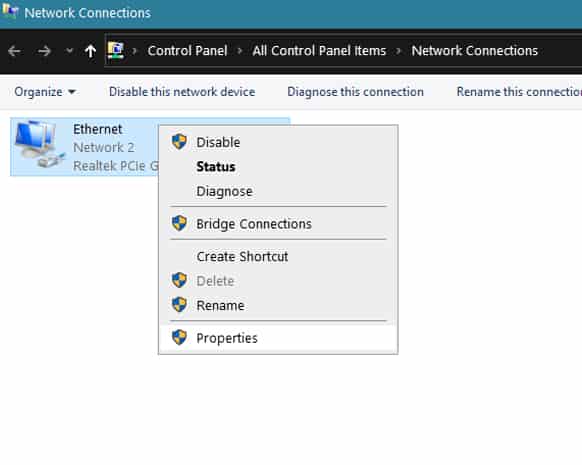
- A pop-up window will appear, double-click on Internet Protocol Version 4 (TCP/IPv4).
- Lastly, click on ‘Use the Following DNS Server Addresses’ and enter the following values:
- Primary DNS Server: 8.8.8.8
- Alternate DNS Server: 8.8.4.4
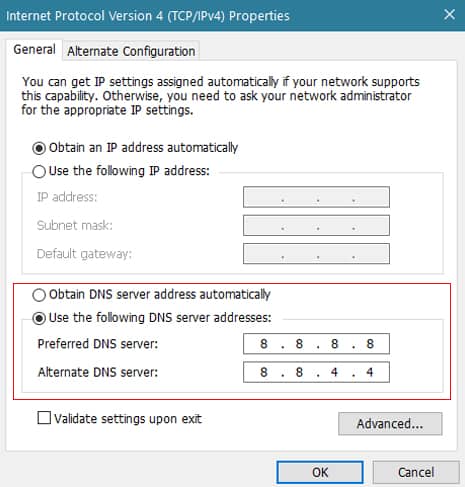
Once done, click on Ok to save the changes and go back to your browser. Try to access a couple of websites to verify if the “DNS Server Not Responding” error is already fixed.
2. Manually Setup Your Mac Address
For some Windows 10 users, the “DNS Server Not Responding” error was fixed by simply entering their Mac Address on their network adapter’s properties.
To do this, you can follow the step-by-step guide below.
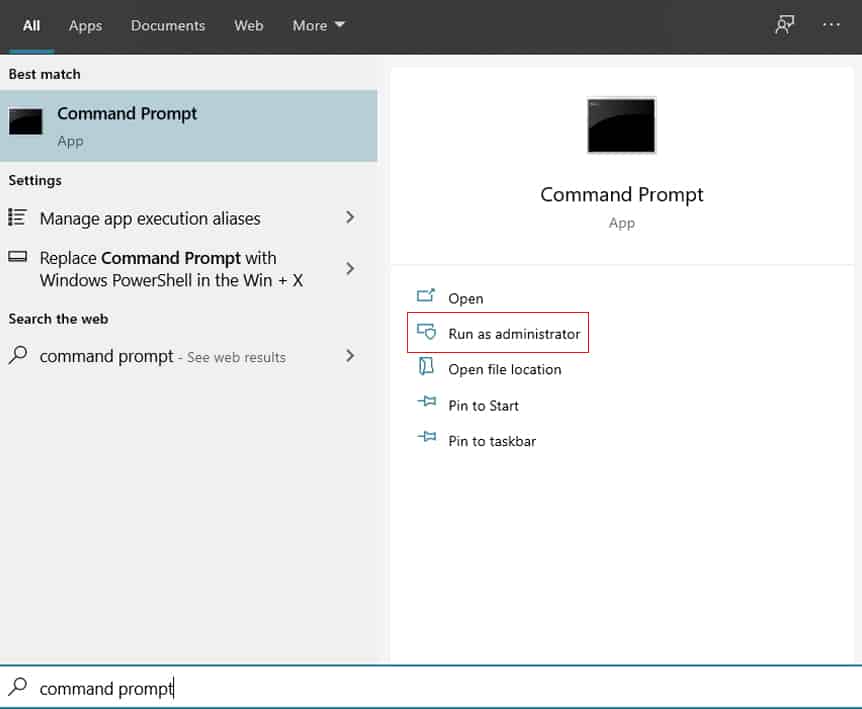
- First, press and hold the Windows key + S on your keyboard and search for ‘Command Prompt’
- Next, click on Run As Administrator to open CMD.
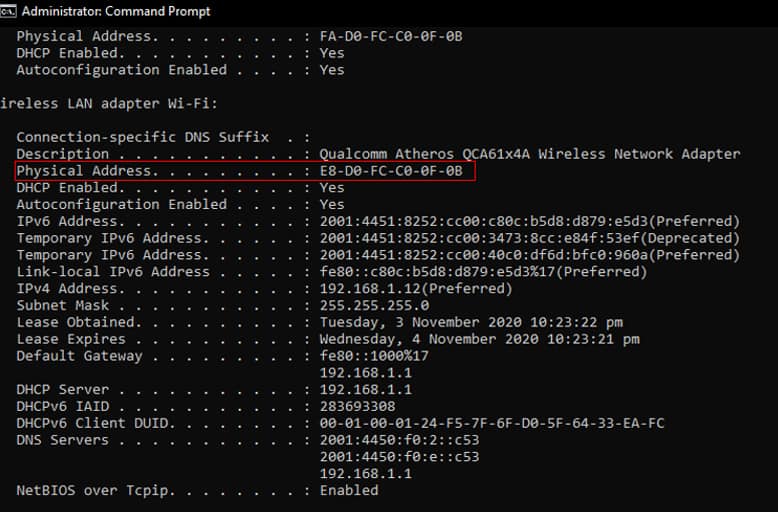
- Inside the Command Prompt, type ipconfig /all and hit Enter.
- Now, locate the current Network Adapter that you are using and take note of its Physical Address. (In our case it is Wireless LAN Adapter Wi-Fi)
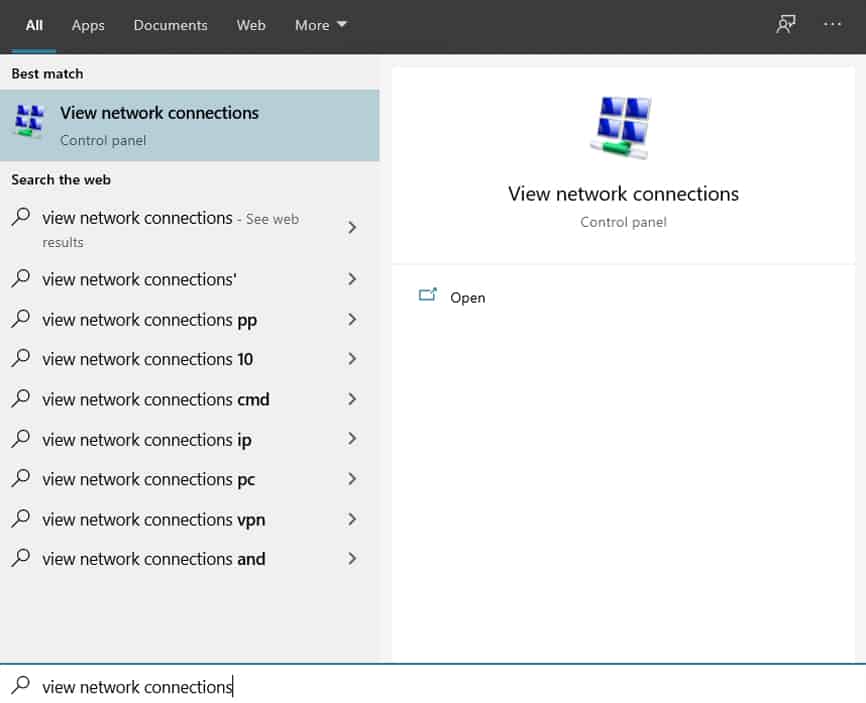
- After that, press the Windows key + S on your keyboard and search for ‘View Network Connections’, and hit Enter.
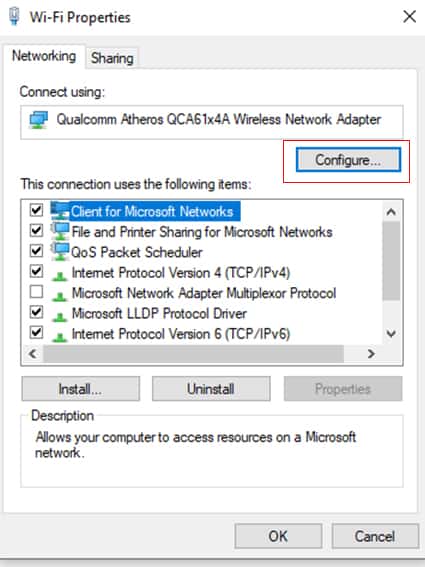
- Inside Network Connections, right-click on your current Network Adapter and select Properties.
- On Properties, click on Configure.
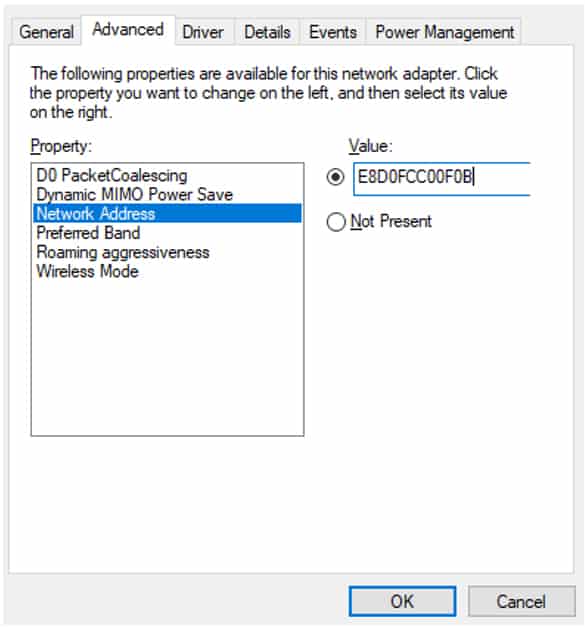
- Go to the Advanced tab, click on Network Address, and enter the Physical Address that you copied.
- Lastly, ensure that the radio button is on Value and hit the Ok button to save the changes.
Go back to your browser once again and try to browse the internet to see if the problem with your DNS server on Windows 10 is already resolved.
However, if you are still seeing the “DNS Server Not Responding” error on your browser, you can proceed to the next method below to fix the problem.
3. Reinstall Your Network Drivers.
Network connection issues could be caused by a faulty or outdated driver. If you are still seeing the DNS server error, then you can try to reinstall your network drivers to solve the problem.
In reinstalling your network drivers, you can follow the steps below to guide you through the process.
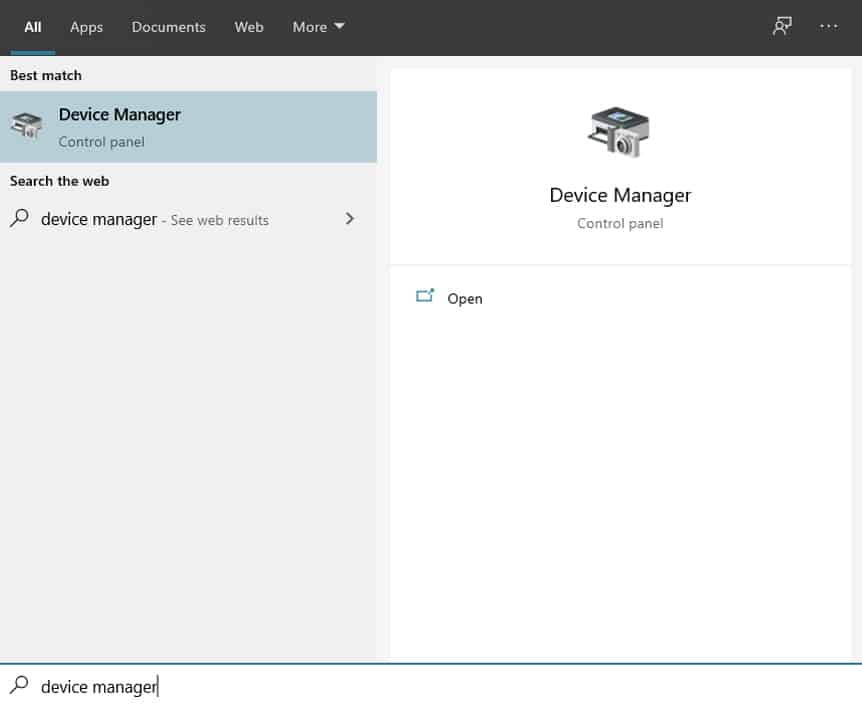
- On your computer, press on the Windows key + S and search for ‘Device Manager’.
- After that, click on Open.
- Inside the Device Manager, click on Network Adapters.
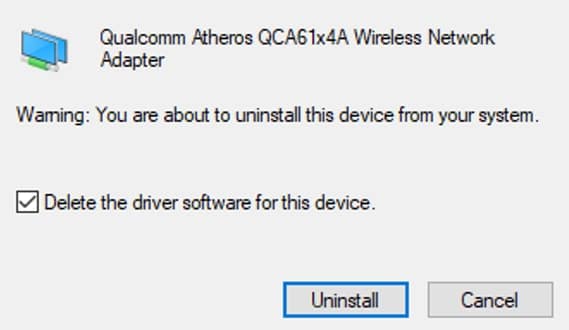
- Now, right-click on your current Network Adapter and select Uninstall Device.
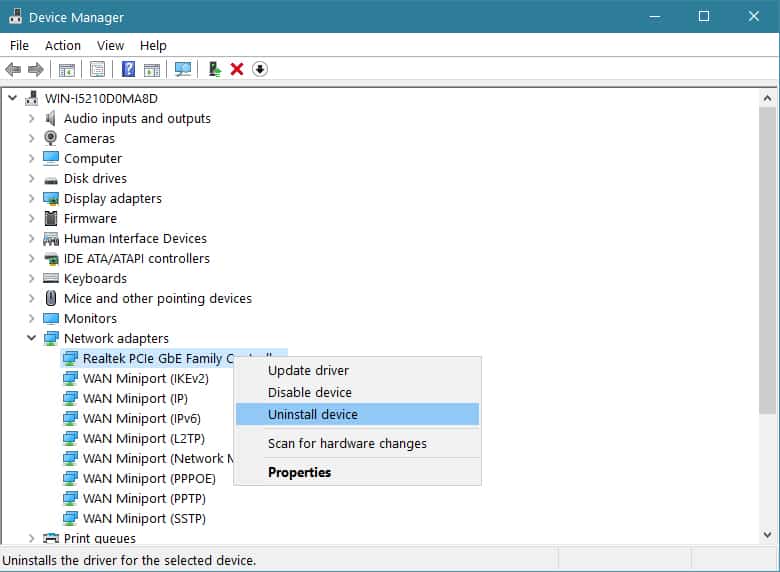
- Lastly, select the ‘Delete the Driver Software’ option and hit the Uninstall button.
After uninstalling your network drivers, restart Windows 10 and it will automatically install the proper drivers for your device.
Now, open your browser and try to access a website to see if the issue with your DNS server on Windows 10 is already fixed.
4. Clear Your DNS Cache
DNS cache is temporary data stored on Windows 10 about DNS lookups which helps browsers load sites that you previously visited faster. However, there are times when these caches get corrupted and can cause the “DNS Server Not Responding” error.
To resolve this, you can clear your DNS cache to get rid of corrupted data on Windows 10.
- Press on Windows key + S and search for ‘Command Prompt’, then click on ‘Run as Administrator’ to open CMD.
- Inside the Command Prompt, type ipconfig followed by these commands one by one and hit Enter:
/flushdns

/registerdns

/release

/renew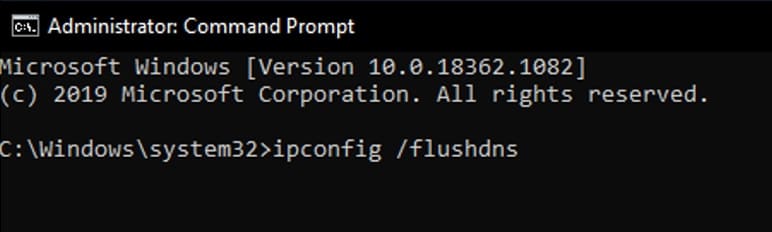
- Once done, give your computer a restart.
Now, fire up your browser and try to access a couple of websites to see if the issue with your DNS server is already resolved after clearing your DNS cache.
5. Restart Your Router.
Since you are using your ISP’s default DNS server, it is possible that your router is experiencing connection issues with your internet service provider. In this case, you can try restarting your internet router to re-establish a stable connection with your ISP.
To do this, locate your router’s power cable which is typically at the back. Now, unplug the power cable from your router to shut it off. Wait for a few seconds, then reinsert the power cable to your router to turn it back on.
Once your router has finished loading up, open your browser once again and try to access different websites to check if the “DNS Server Not Responding” error message would still occur.
6. Disable Internet Protocol Version 6 (IPv6).
Internet Protocol Version 6 is the latest version of Internet Protocol which performs faster compared to IPv4. However, IPv4 is still the primary Internet Protocol that is being utilized by most users.
In some cases, IPv6 can cause conflicts with IPv4 instead of improving its performance. This causes your network connection to become unstable.
To fix this, you can disable IPv6 on Windows to get rid of the “DNS Server Not Responding” issue.
- On your keyboard, hit the Windows key + X to open the Quick Access Menu.
- After that, click on Network Connections.
- Next, click on Change Adapter Options.
- Now, right-click on your current Network Adapter and select Properties.
- Lastly, uncheck Internet Protocol Version 6 and click on Ok to save the changes.
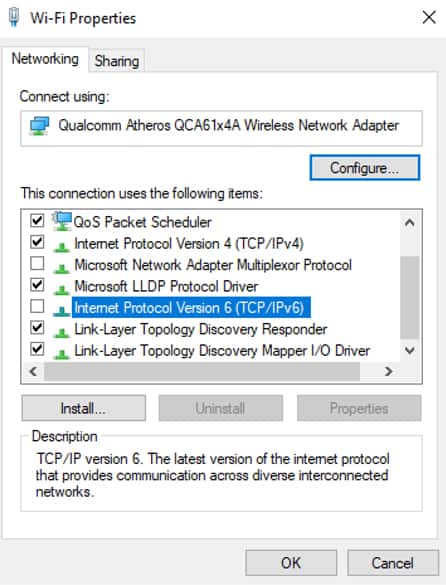
Restart your computer afterward and try to access the internet once again to see if the problem with your DNS server is already fixed.
However, if you are still having issues with your network connection, you can proceed to the next method below to solve the problem.
7. Turn Off Microsoft Virtual Wi-Fi Adapter.
Another cause of DNS server problem on your system is the Microsoft Virtual Wi-Fi Adapter. If you have this installed on your device manage, be sure to uninstall it to fix the “DNS Server Not Responding” problem on Windows 10.
Check out the guide below on how to disable the virtual adapter.
- On your computer, press on the Windows key + S and search for Device Manager.
- Next, click on Open.
- Inside the Device Manager, click on Network Adapters.
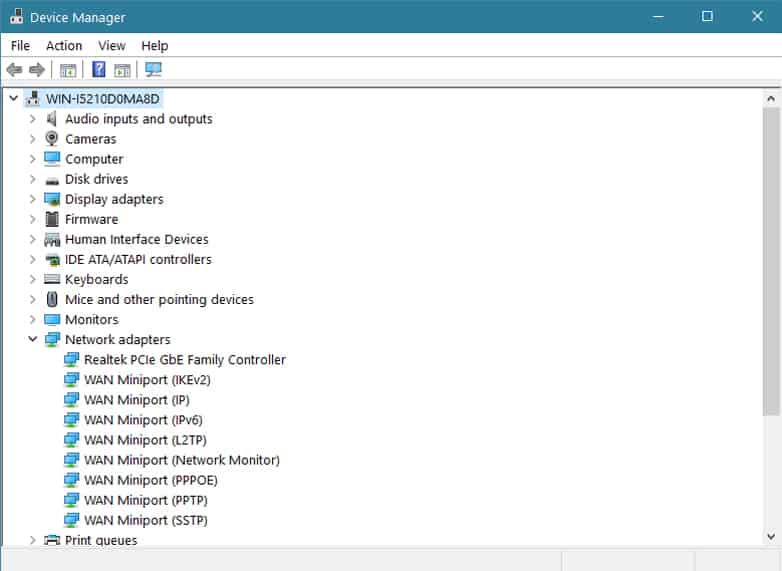
- Now, right-click on Microsoft Virtual Wi-Fi Miniport Adapter and select Disable Device.
- Lastly, a pop-up will appear verifying the action, click on Yes to proceed.
After that, restart Windows 10 and try to access the internet afterward to check if the issue with the DNS server on Windows is already resolved.
8. Disable Unused Adapters.
If you have multiple network adapters but only use one, you can simply disable other network adapters to avoid conflict on your system.
To disable unused network adapters on Windows 10, follow the steps below to guide you through the process.
- First, press the Windows key + X on your keyboard to open the Quick Access Menu.
- After that, click on Network Connections.
- Inside Network Connections, click on Change Adapter Options.
- Lastly, right-click on the Network Adapter that you are not using and select Disable.
Now, go back to your browser and try to access a few websites to see if the “DNS Server Not Responding” error on Windows 10 is already resolved.
9. Update Windows 10.
Network connection issues such as DNS server errors could also be related to Windows in general. Possibly, the current version of Windows 10 installed on your system has a bug or error related to DNS settings that cause the problem on your computer.
In this case, it is possible that Microsoft released an update to patch the issue on Windows 10.
To check for Windows updates, follow the guide below.
- On your computer, press on Windows key + I to open Windows Settings.
- Inside Windows Settings, click on Update & Security.
- Lastly, click on the Windows Update tab from the side menu. This will prompt your system to automatically check for any update available on your system. Follow the on-screen prompts to download and install the update to your computer.
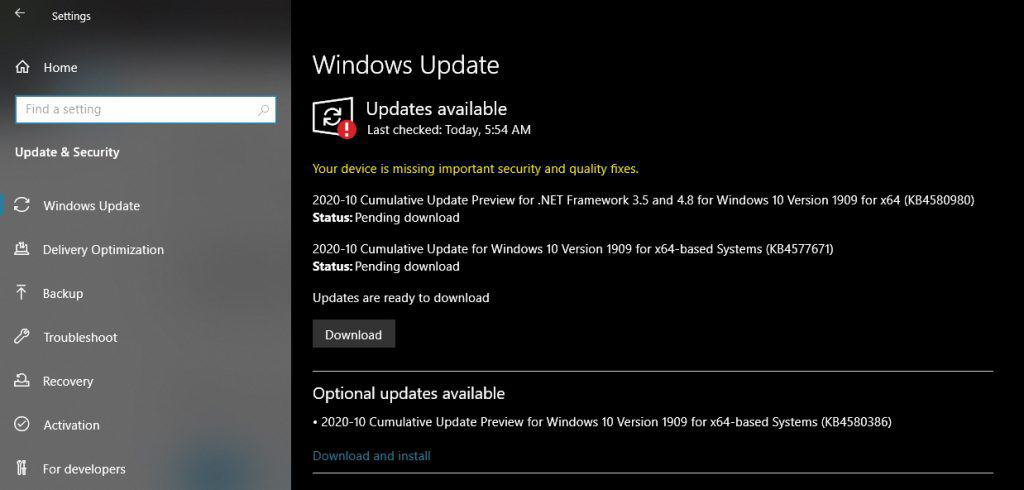
After updating Windows 10, restart your computer and try to access several sites using your browser to see if the issue with the DNS server was resolved by updating your operating system.
10. Execute Netsh Command.
Netsh command is an advanced scripting utility available on Windows that allows you to configure your system’s network configuration. Running this on your computer can possibly fix the “DNS Server Not Responding” error on Windows 10.
Check out the guide below on how to use Netsh scripting utility on the command prompt.
- First, open Command Prompt on your computer with administrative privileges.
- Once Command Prompt has launched, type the following commands one by one and hit Enter.
netsh init ip reset

netsh winsock reset

ipconfig /flushdns

ipconfig /renew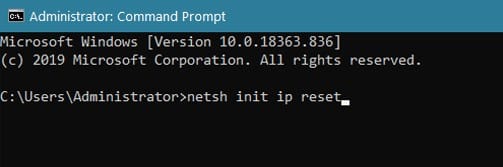
- After executing the commands above, restart your computer.
Now, open up your browser and try to access several websites to ensure that the problem with “DNS Server Not Responding” is already fixed.
11. Use Another Browser.
The “DNS Server Not Responding” error on Windows 10 could also be isolated on a specific browser. Possibly, the browser that you are currently using is experiencing an issue on their side which makes it impossible for you to browse the internet.
In this case, you can try using alternative internet browsers like Chrome, Firefox, Opera, and Microsoft Edge to see if the issue is indeed isolated on a specific browser.
In the meantime, use other browsers first and check from time to time if your preferred browser is already working properly.
12. Disable Your Windows Defender Firewall.
In some cases, Windows Firewall may cause conflict with your browser and blocks it from accessing your internet connection. To bypass this, you can try to disable your firewall to see if the “DNS Server Not Responding” issue would be fixed.
- On your computer, press on Windows key + S and search for Windows Defender Firewall.
- After that, click on Open.
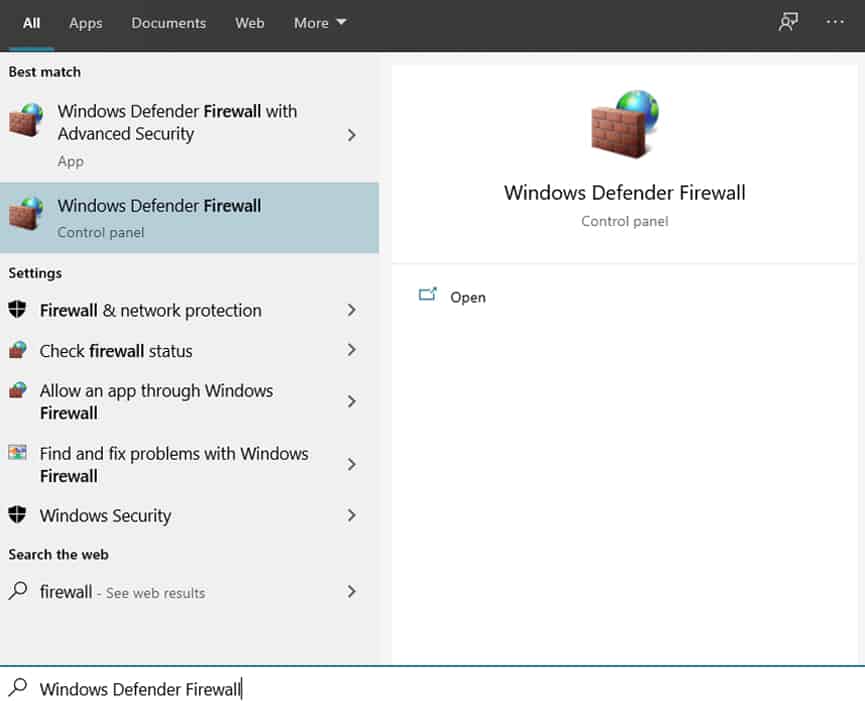
- Inside Windows Defender Firewall, click on ‘Turn Windows Defender Firewall On or Off’ from the side menu.
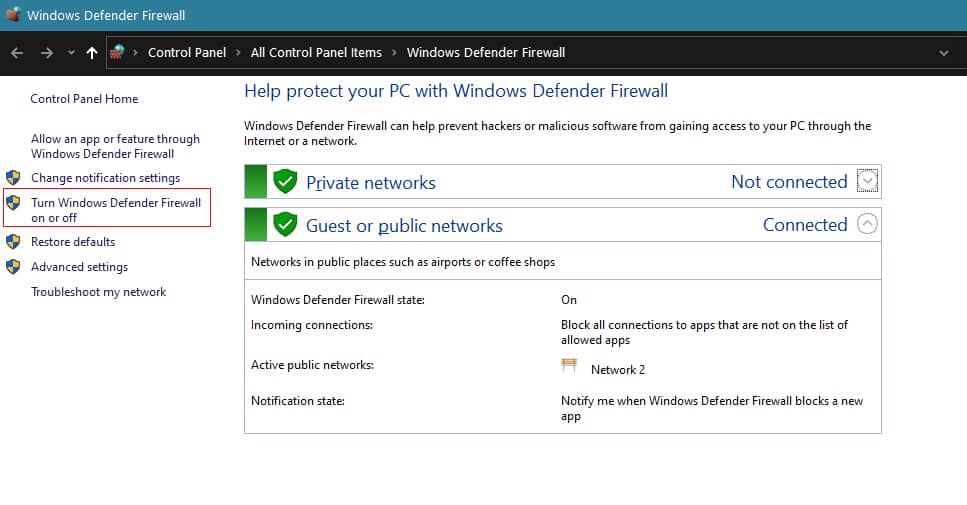
- Lastly, select the ‘Turn Off Windows Defender Firewall’ option for both private and public networks and hit the Ok button to save the changes.

Alternatively, you can also add your browser to the whitelist so that Windows Firewall would not block it from accessing your internet connection.
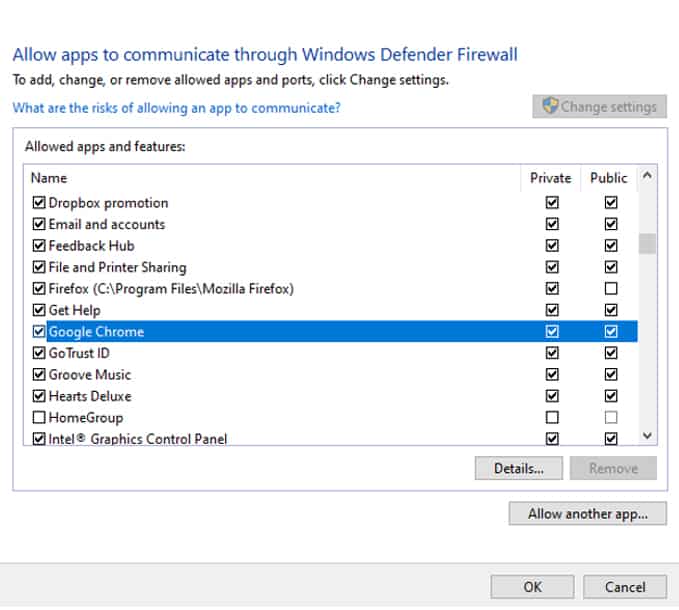
- On the Windows Defender Firewall menu, click on ‘Allow an App or Feature Through Windows Defender Firewall’.
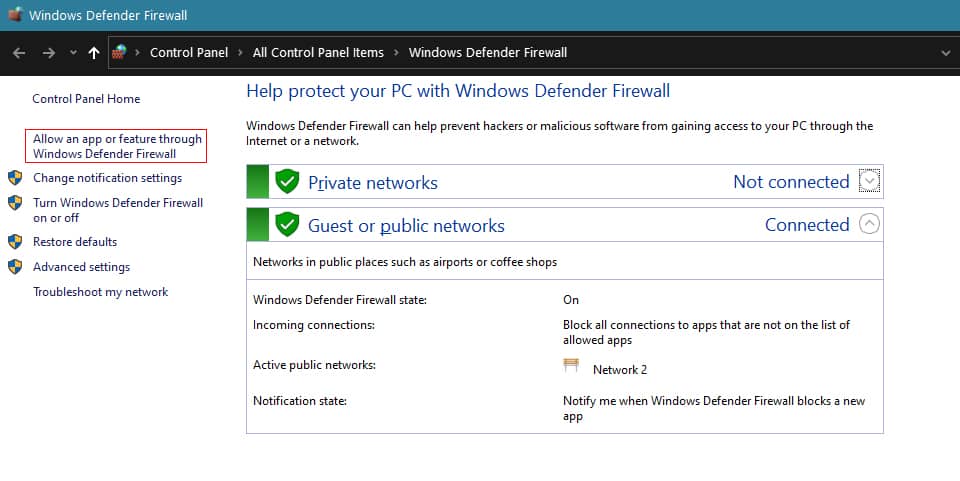
- After that, locate your browser from the list of applications and make sure that it is marked checked.
- Lastly, click on Ok to save the changes.
Now, restart your computer and try to browse the internet to see if the “DNS Server Not Responding” problem is already resolved.