We use computer hard disks to store many things. Apart from booting your favorite OS, your HDD might be carrying important files and documents you never want to lose. That is why disk failure is a dread for many computer users. But you can tell if your HDD is failing before it dies completely before recovery.
In some computers, the manufacturers include a System Monitoring and Reporting Tool (SMART) to your OS during the installation before shipping the computer. The software can detect any problems with your computer and alert you before you meet disasters that may cause loss of data.
But it is not always the case. It is advantageous to have a copy of your HDD content to bypass any unpleasant circumstances. You, therefore, need a working solution to clone your drive content to another one for safe storage.
It turns out, however, that not every “cloning” software out there really clones a disk drive to another for an exact copy. The software you see in the market will back up the content as a compressed folder for manual transfer to another drive or cloud storage. Some can only copy the files over, but not all support creating an exact HDD copy containing all the partitions and filesystems.
For a complete HDD backup to another disk, you need Clonezilla, a disk cloning software available as a bootable disk image. In this post, we will guide you on a step-by-step procedure to transfer all the information from one disk to another using Clonezilla.
Clonezilla Features
Why do we prefer Clonezilla to other disk backup or imaging and cloning tools? The secret lies in its versatility. You can use the program to rescue or back up data from any HDD to another HDD maintaining the filesystem and file structure as that of the original disk.
- It supports both MBR and GPT disk partition formats.
- Supports several operating systems and filesystems like FAT12, FAT16, FAT32, NTFS, EXT2, EXT3, EXT4, btrfs, xfs, etc.
- It can reinstall various bootloaders including GRUB legacy, GRUB2, and Syslinux to your new HDD.
- Backup can encrypt your disk image to secure the content.
- Supports restoring disk images to several disks attached to your computer.
Many other features allow you to fine-tune your backup and cloning preferences. You can, for instance, modify OS parameters before you transfer the content to your new HDD.
How Clonezilla Works
We all understand that the process of copying disk data can take a long time, depending on the disk size. With Clonezilla, the process is a bit simplified with the mechanism through which it works. Because the software can ready many OS types and their filesystems, it is easy to create an exact copy of your HDD within the shortest time possible.
The duration can depend on the number of partitions you have and the size of data you stored on the drive partitions. For the known filesystems, the program copies only the used space to the new HDD. Where it cannot identify the filesystem, it copies the parts with the in-build dd program.
In summary, you can copy your current HDD to a new drive without caring about the volume size differences. By logic, all that will matter is if your currently used space will fit on the new drive. But to achieve the backup process to a smaller disk, you first need to shrink the partitions to ensure they will fit your new hard disk drive.
Preparation and Requirements
Before you start your backup process, you need to prepare your computer with the appropriate disks and software. Here are the mandatory requirements for successful cloning of any HDD on your computer.
1. A Windows Computer
Any computer and OS can work. But we will need Windows for the purpose of this tutorial. It does not have to be the computer whose HDD you want to back up. The Windows PC will help us to create the bootable media with Clonezilla Live.
2. At Least 2 Hard Disks
The first HDD is the one you want to back up and the second one is the one you want to clone your information to. The HDDs do not need to be bootable since you can clone any type of content on any disks.
But I am almost sure that you want to secure your current operating system and your custom settings. That is the main reason many people choose disk cloning instead of ordinary data backup.
You can use more HDDs to clone one disk to more than one new hard drives. But ensure you have a way (eg SATA USB adapter cables) to connect the hard disks to your computer.
3. USB Flash Disk or Blank DVD
If your computer or laptop supports DVDs, you can grab one blank DVD and insert it into the DVD tray. Ensure the computer can read the blank DVD before you proceed. In Windows, you will get a dialogue whether you want to burn files to the blank disk.
In case your computer does not have an in-built DVD tray, you can grab an external (USB) DVD writer. But a thumb drive will be ideal if you do not have a DVD drive. It also helps you to rescue the disks in other people’s computers without having to worry about the bootable DVD getting damaged.
4. Clonezilla Disk Image
Clonezilla can boot from a DVD or a USB drive (Both Hard Disks and Flash Disks supported). You can also install it on your local HDD where you run your current OS. If you like, you can also run it from a PXE network (choose network boot from your computer’s boot menu).
But for faster performance and to avoid disk write permission issues, it is ideal to run it from an external media so it boots to RAM.
To burn the disk image for booting, head over to the Clonezilla downloads page and grab the necessary file. On the downloads page, you will see various download options. I recommend the “Alternative stable” version that is derived from Ubuntu live. This supports the latest computer hardware, but it contains proprietary software.
When you click on the “alternative stable” link, you will come to a page to choose three parameters before you can download your file. The Clonezilla guides say that if you have a DVD, use a .iso image, and for USB flash drives, use a .zip file.
However, the required file for our case is the ISO image. But first, you need to choose your computer architecture. For the repository, you can use any.
For the purpose of this tutorial, I will cover the installation of the ISO image to a USB thumb drive. The burning process for the ISO to a DVD is pretty easy. All you need to do is burn as you burn any disk image to your blank DVDs on Windows.
5. Disk Image Writing Tool
To write any bootable disk image to a USB disk, you need a writing tool. Precisely, you will want to download Rufus for this task. Head over to Rufus website and download the portable version of the software. It is clean and does not add any junk to your system registry.
Write Clonezilla Live to USB Thumb Drive
After downloading the live disk image, launch Rufus on your computer. The program is straightforward.
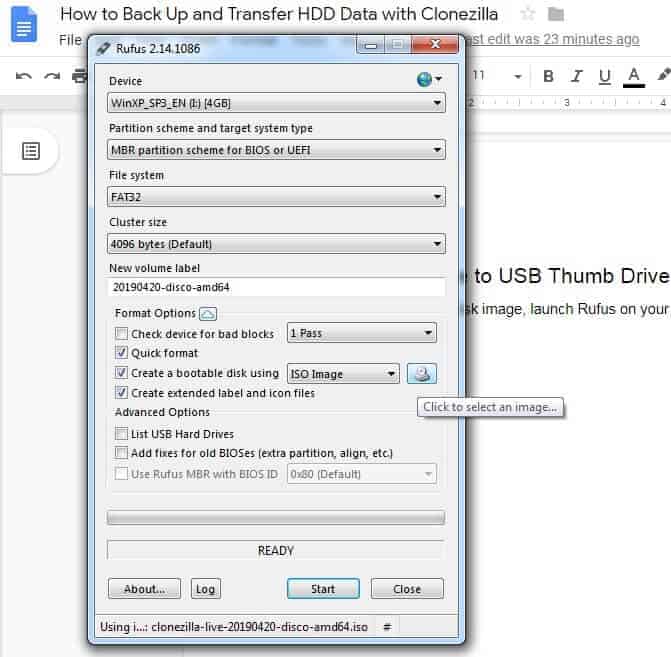
Select the attached USB thumb drive from the DEVICE dropdown menu. Next is to click on the disc icon on the “Create a bootable disk” option. Navigate to the location where you downloaded Clonezilla and select it. All other details will fill in as necessary.
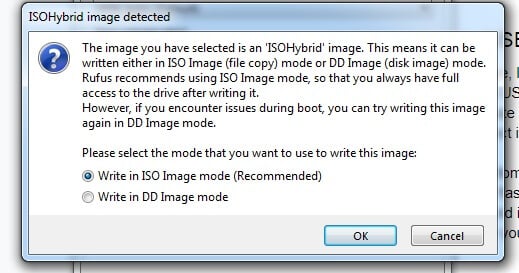
Click on the “Start” button at the bottom to write the image to your flash drive. Remember that you will lose all the content on your flash disk. I hope you have backed up before running the utility. Clonezilla iso image is a “hybrid image” that you can write with the normal writing process or with dd. You can choose any as per your preferences.
Wait until the writing process completes. Close the Rufus app window and reboot your computer. If you want to use the program on another machine, please eject it before plugging it out of the computer. Then turn off the target computer, insert the drive, and turn on the system.
Boot Up Clonezilla Live
On the target computer, after powering on with the thumb drive inserted, use the keyboard keys to go to the boot menu. Different computer manufacturers give various keys for the purpose. On some computers, you hit the ESC button. On mine (and many models in the market), I use F12. Some also deploy F6 for the purpose.
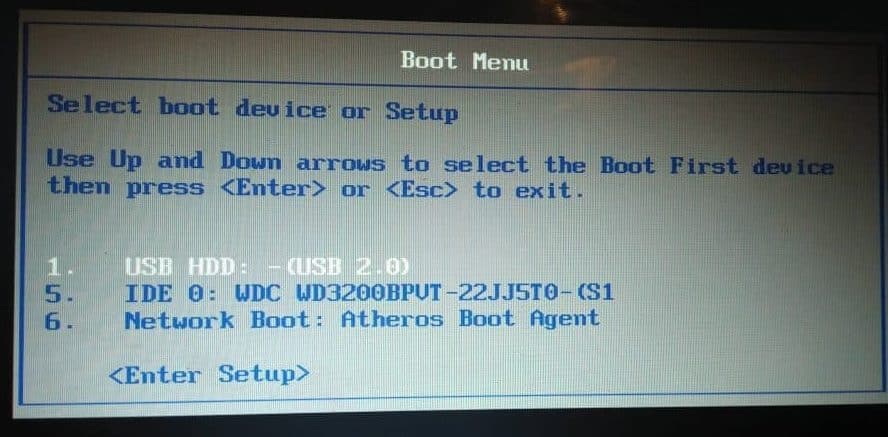
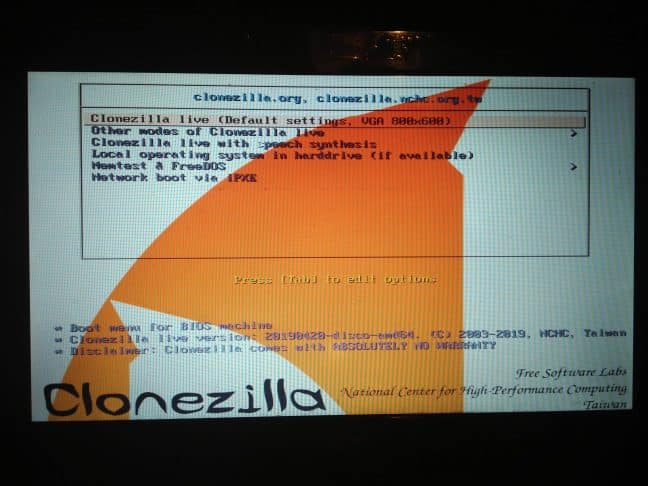
Once you are on the boot menu, select the flash disk as your boot device. Hit the ENTER (or Return) key on your machine to boot up Clonezilla Live.
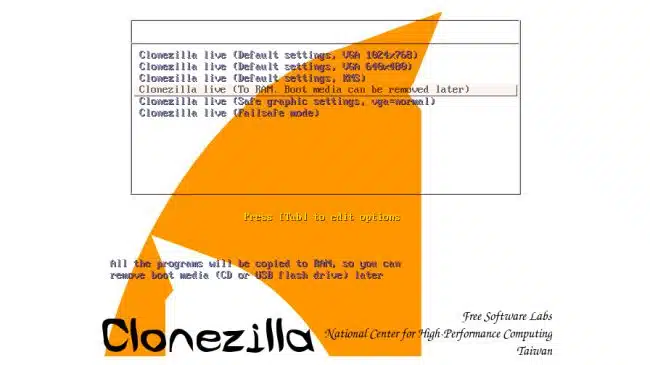
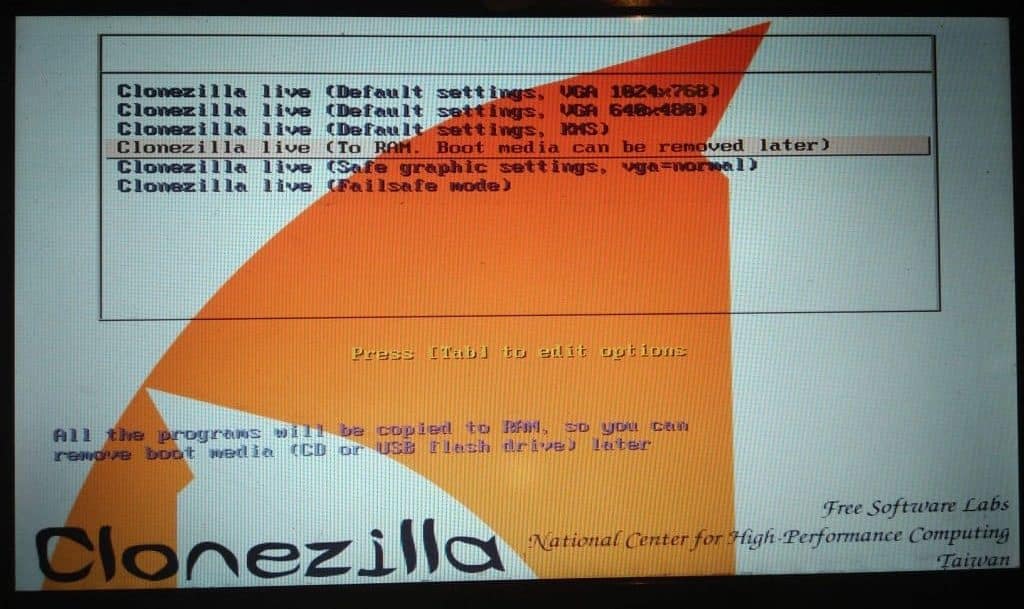
Clonezilla will take a few seconds to load the live splash that will guide you through the process. The first thing is to identify the type of booting you want. You can choose from various boot options including exiting the program to launch your HDD OS. But remember you cannot clone your disks unless you have fully booted Clonezilla and continue with the process.
On the welcome page, select the second option (use the up and down arrow keys) that says “Other modes of Clonezilla Live” and hit the enter key. The next screen shows you various preconfigured options you can boot with. I prefer “To RAM” so that it releases the flash disk after booting. This option is ideal if you need to plug your external disk to the same USB port.
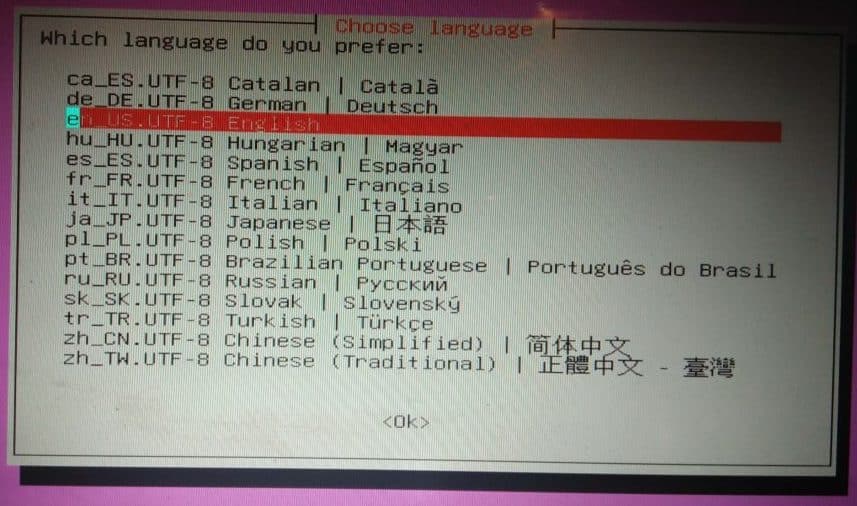
The next step is to choose your preferred language for running the program.
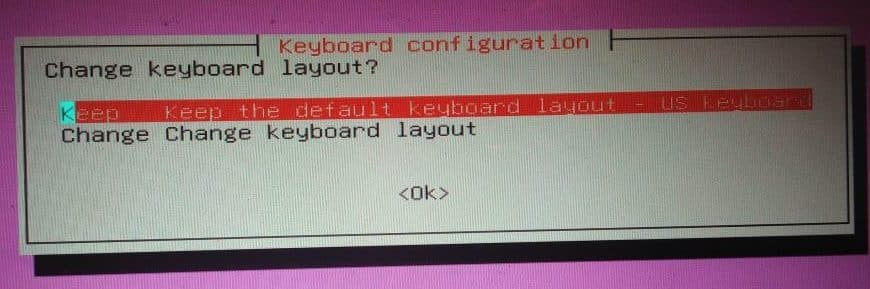
After selecting your language, choose your keyboard layout (or your preferred input layout).
You will now be presented with a screen to choose the mode you want to use. The “Start Clonezilla” option allows you to use the wizard that guides you through the cloning process. The text mode drops you to the Terminal (“command line”, if you prefer).
Start the Cloning Process
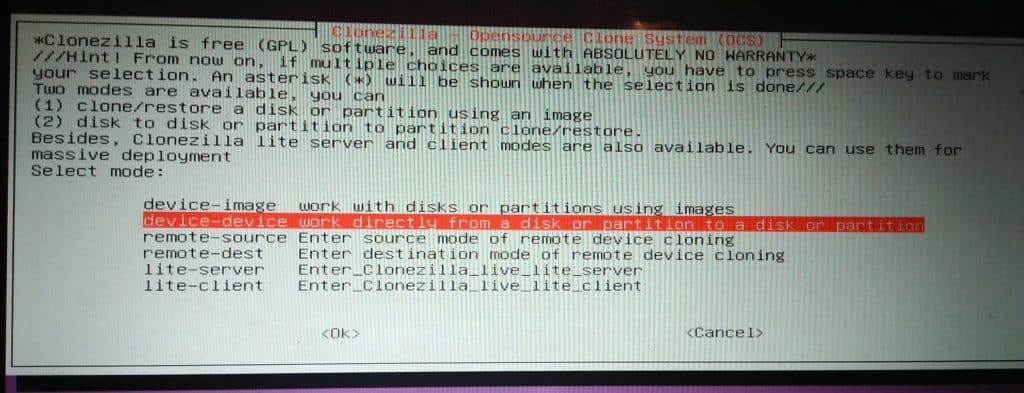
After successfully launching Clonezilla, you will immediately see the backup or cloning menu. First is to set the cloning option you want. Ideally, you want to choose the device-device cloning. But if you want to create multiple disks, you can choose device-image. You will have the option to save the image to your local disk and use it to write to different disks later.
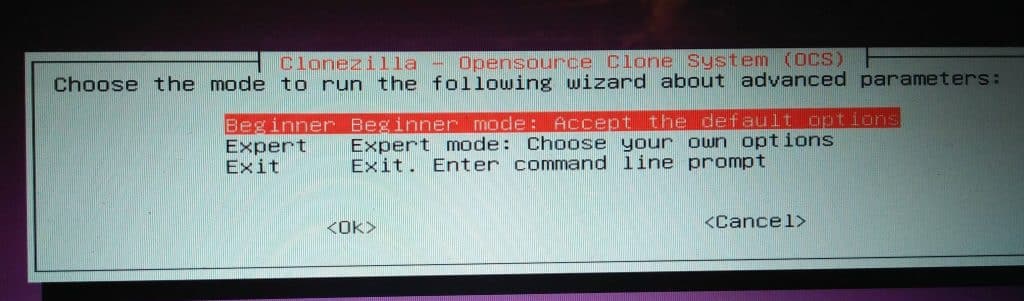
The next step is to choose whether you want to run the wizard in beginner or expert mode. Choose the beginner mode for cloning. The expert mode allows you to customize the backup. If you are not sure of what you are doing, go with the “beginner” option.
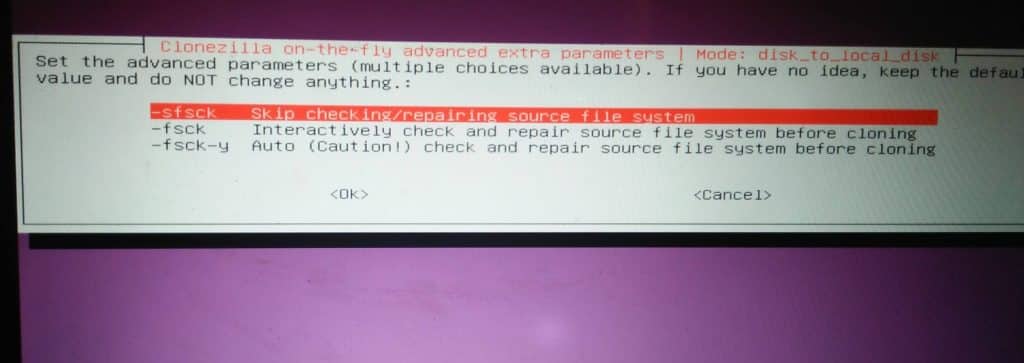
You will now be asked for advanced parameters. You can ignore and hit ENTER to continue. This uses the default. The parameters option is for advanced users who know the commands that come with Linux. But there is no need to wait longer to achieve the same results.
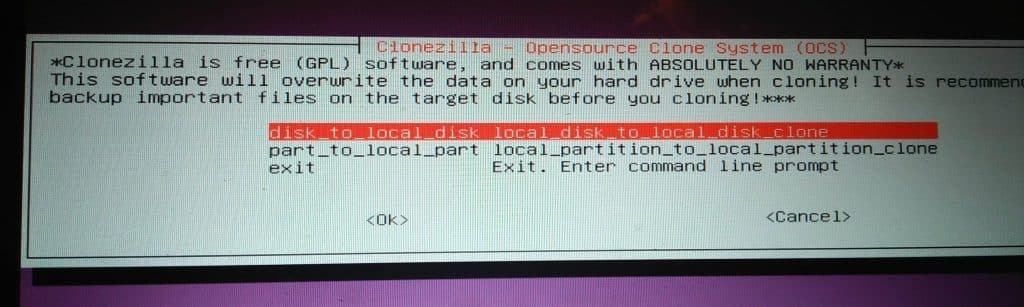
In the next step, the wizard will ask if you want to clone the entire disk or a partition. If you want to carry along your operating system, bootloader, and filesystem information, back up the entire hard drive using the local disk to local disk clone option.
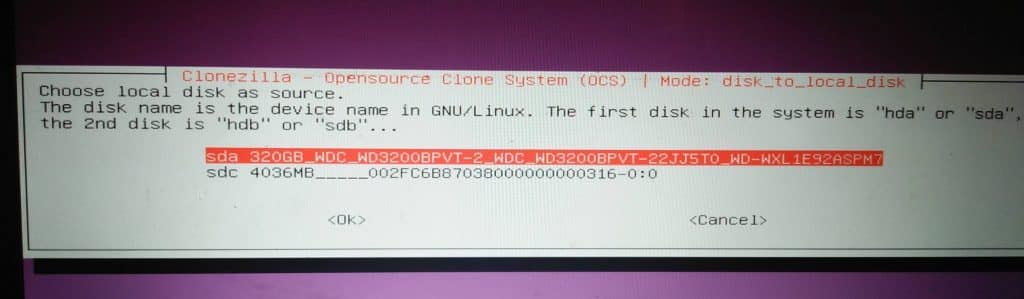
Next is to identify the source disk. The source is the disk that you want to back up its content. This is usually sda or hda. But it may be a different identifier. Check with your system before proceeding. You will also have to identify the target disk where the source will get copied to.
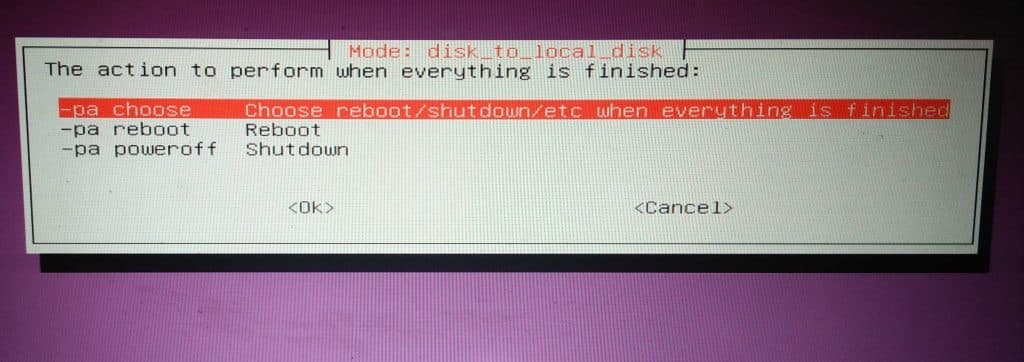
The next step will ask you what to do after successful cloning. You can shut down the system or reboot. But it is ideal to leave it at the default selection so that it asks you again after the process.
Cloning the Disk
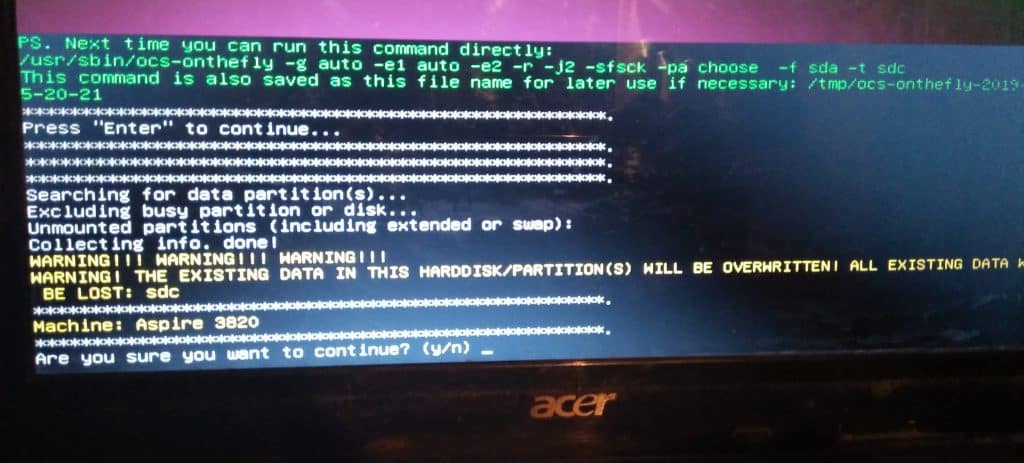
After entering all the information, you will now be asked to confirm if you want to start the cloning process. You can reply with Y (yes!) or N (no!). Choosing “Yes” will commence the backup and “No” will cancel it.
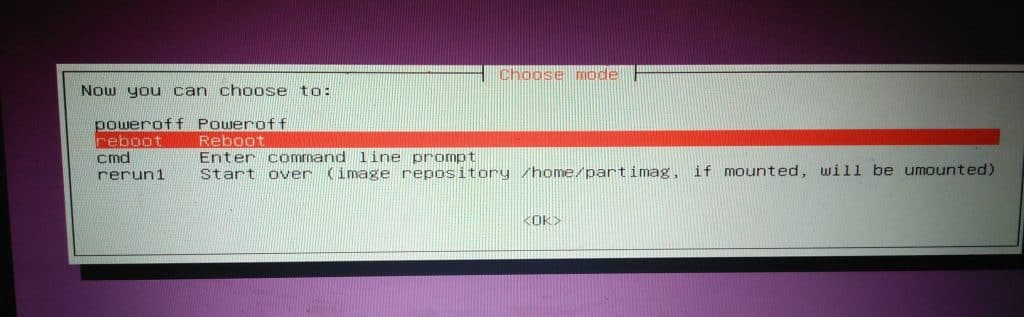
Whichever is your choice at this stage, you will go back to choose what to do next. You can reboot or power off your computer.
But note that if you choose to proceed, do not interrupt with the backup or your target disk will have corrupt data that cannot boot or read. You will have to start again to do the cloning successfully.
The Bottomline
Cloning your hard disk is the surest way to keep your information secure and to avoid the possibility of damaged data. Unlike the system file backups, cloning allows you to keep entirely everything including the passwords and bookmarks within your operating systems.
To confirm if your cloning was successful, try to insert and boot from the new hard disk. Access various files on your operating systems and see how it behaves. If everything is intact, you can safely keep the drive knowing that your information is safe.
One thing to remember, however, is that in case of operating system backups, you may not boot the disk on a different computer. Your new hard drive can only successfully boot and load programs and files on the computer you were using the old drive that you back up.
If you plan to sell your current PC, you better back up any data but ignore the OS – unless you are using Linux. Linux systems are easy to transfer from one computer to another. But the hardware must match that of the OS installed. But you still have to modify a few files to get the complete operating system running on your new computer – thanks for Linux’s open source.