Just like any operating system, Windows 10 gets a few updates from time to time that are supposed to bring performance improvements, fixes for existing bugs, and user-experience optimization.
However, Windows 10 is also known for its nerve-racking updates that add more problems to some users instead of fixing the errors that are already existing. Check Microsoft’s community page and you would see dozens of users complaining about Windows updates.
Now, let’s give credit to Microsoft for trying to release frequent updates for improving their operating system, however, they should do a better job of minimizing (if not eliminating) issues on Windows updates.
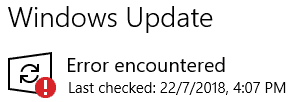
Recently, there have been reports from several users who are having a hard time installing Windows updates and greeted with a 0x8024a105 error code.
Sadly, this error code is not included on Windows 10’s common error code list which makes it even harder for most users to find a fix for it.
But don’t give up just yet. We got you covered!
Today, we are going to show you a couple of ways on how you can fix the error code 0x8024a105 when installing Windows 10 updates.
Let’s give it a shot, shall we?
- 1. Restart Your Computer.
- 2. Delete the Update File.
- 3. Run Windows Update Troubleshooter.
- 4. Use the DISM Tool.
- 5. Reset the Catroot2 Folder.
- 6. Restart System Services.
- 7. Rollback Windows Updates.
- 8. Reinstall Windows.
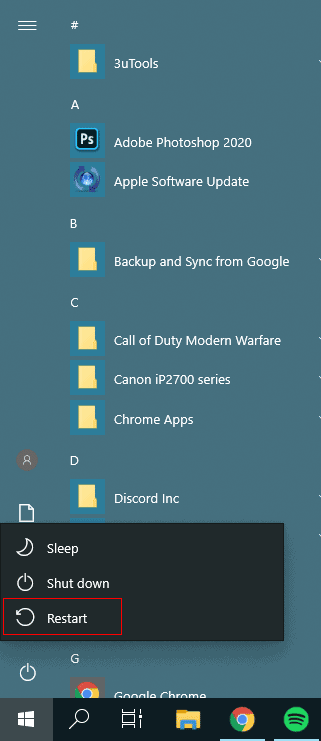
1. Restart Your Computer.
Normally, if you contact any tech support to assist you with your problems, more often than not their first instruction is to restart your device. Now, this may be a simple solution, but restarting your computer can do a lot on your system.
Restarting your computer gives a chance for your operating system to reload all of its system files, terminate unnecessary applications running, and resets your kernel.
With that in mind, check out the steps below on how to properly restart your computer.
- First, click on the Start Menu icon on your Taskbar.
- After that, click on the Power button to open the Power Options menu.
- Lastly, click on Restart and it should begin the process.
Wait for your computer to restart which may take a few seconds. Windows should automatically attempt to install the update after the restart.
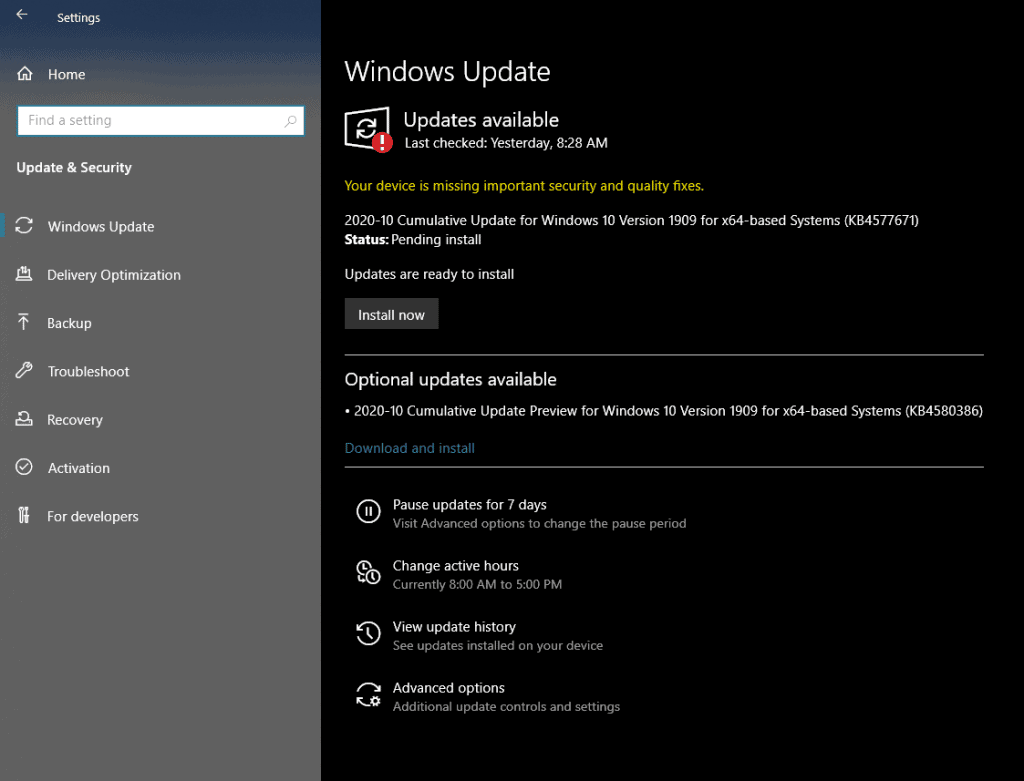
However, if Windows Update did not start, you can manually start it by going to Windows Settings > Update & Security > Windows Update.
2. Delete the Update File.
If restarting your computer did not work in fixing the error code 0x8024a105 when installing Windows update, you can try deleting the downloaded update files on the Software Distribution folder.
Possibly, the files were not downloaded properly on your system which explains the error code when installing the update.
Follow the steps below to guide you on how to delete the update files from your system.
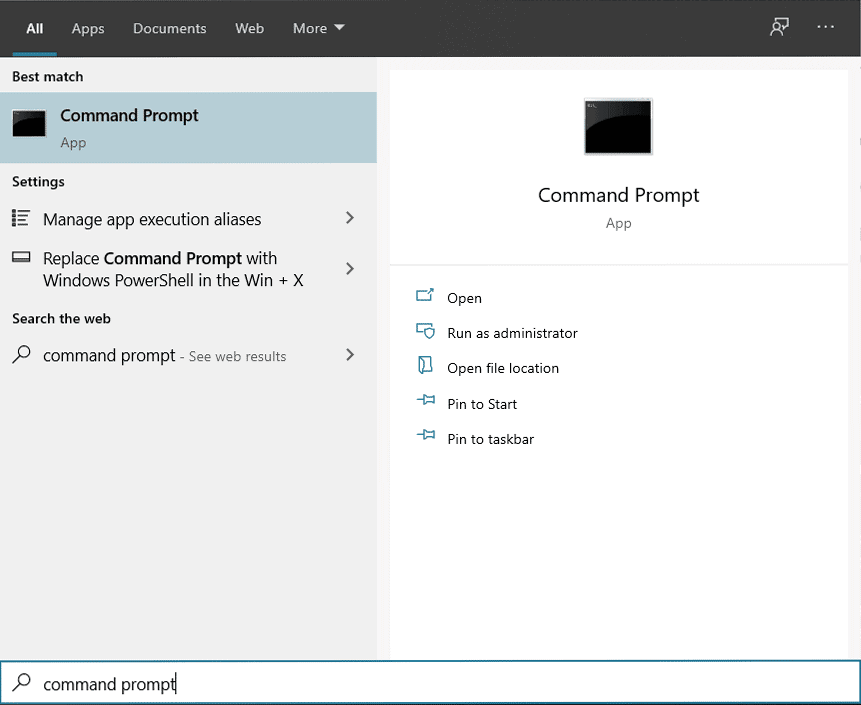
- First, press on the Windows key + S on your keyboard and search for ‘Command Prompt’.
- After that, click on Run As Administrator to open it.
- Inside the Command Prompt, type the following commands one by one and hit Enter:
net stop bits

net stop wuauserv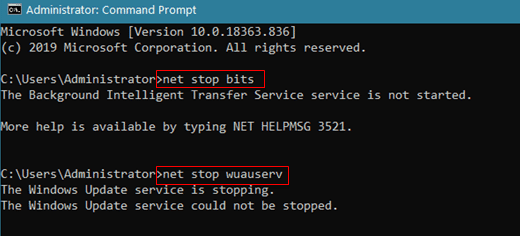
- Now, press on Windows key + R on your keyboard to open the Run Command Box.
- Type C:\Windows\SoftwareDistribution on the text box and click the Ok button to open the folder.
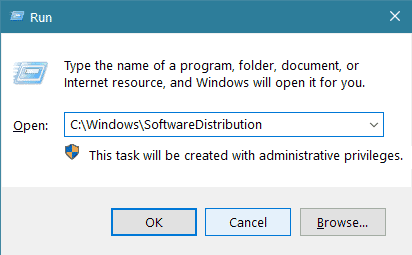
- Lastly, select all the items inside the folder and hit the SHIFT + DEL key on your keyboard to delete the update files.
After doing the steps above, restart your computer and navigate back to Windows Settings > Update & Security > Windows Update to download the update files once again.
Once the update files are downloaded, install the latest version of Windows 10 to your computer to see if the error code 0x8024a105 is already fixed.
3. Run Windows Update Troubleshooter.
Since Windows 10 is known for its problematic updates, Microsoft put a built-in troubleshooter on their operating system that allows users to fix various issues with Windows Update.
To run Windows Update Troubleshooter on your system, follow the step-by-step guide below.
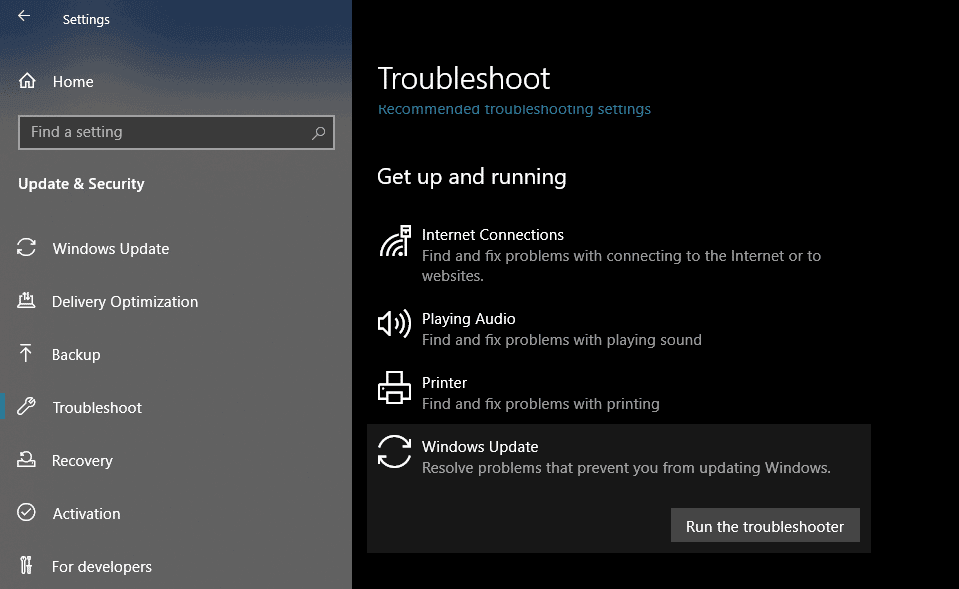
- On your keyboard, press on Windows key + I to open Windows Settings.
- Inside Windows Settings, click on Update & Security.

- After that, click on the Troubleshoot tab from the side menu.
- Lastly, click on Windows Update and select Run the Troubleshooter. This should launch Windows Update Troubleshooter, follow the on-screen prompts to scan for Windows Update errors.
If the troubleshooter suggested a possible fix for the issue, click on the apply this fix button to resolve the error code 0x8024a105 on Windows 10. 0x8024a105
Now, try to update Windows 10 once again to see if the error message would still occur during the update process.
4. Use the DISM Tool.
Deployment Image Servicing and Management tool or DISM is a powerful Windows 10 utility program that allows users and system administrators to fix complex Windows 10 errors like the one that we are dealing with.
Check out the guide below on how to run and use DISM on your computer.
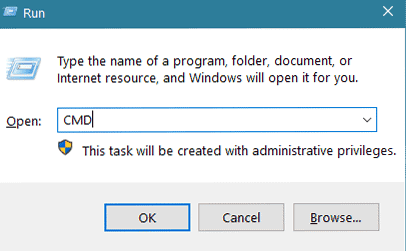
- First, press on Windows key + R to open the Run Command Box.
- After that, type CMD and click Ok to open Command Prompt.
- Inside Command Prompt, type dism /online /cleanup-image /checkhealth and hit Enter.
- Lastly, DISM would scan for any errors on your system and attempt in repairing it.
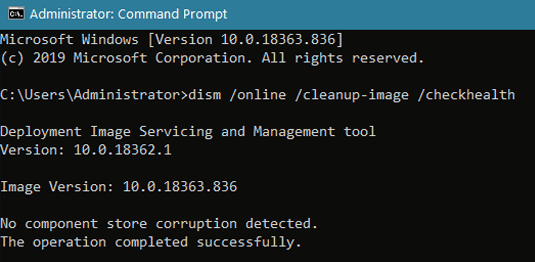
After repairing your system, restart your computer and try to install the Windows Update once again to see if the error code 0x8024a105 would still occur on your system.
However, if you the update still refuses to install completely on your computer and the error code still shows up, proceed to the next method below to try and fix the issue.
5. Reset the Catroot2 Folder.
Catroot folders are system folders used by Windows Updates in installing the actual files to your system. Possibly, these folders got corrupted during the update which caused the error code 0x8024a105 on your system.
To fix this, simply follow the steps below to reset the Catroot folder.
- First, press on Windows key + S and search for Command Prompt.
- After that, click on Run As Administrator to open it.
- Inside the Command Prompt, type the following commands and hit Enter:
net stop cryptsvc

md %systemroot%system32catroot2.old

xcopy %systemroot%system32catroot2 %systemroot%system32catroot2.old /s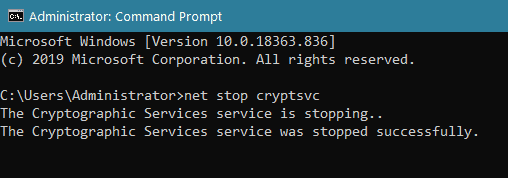
- Next, press on Windows key + R to open the Run Command Box.
- Inside the text box, type C:\Windows\System32\catroot2 and click the Ok button.
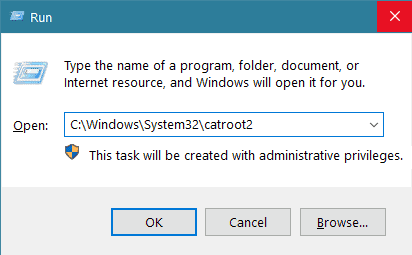
- Lastly, delete all the items inside your Catroot2 folder and restart your computer.
Now, try to update Windows 10 once again to verify if the error code 0x8024a105 would still occur when you install the update on your system.
6. Restart System Services.
Services like Background Intelligent Transfer, Windows Update Service, and Workstation Service are some of the components needed by Windows when installing updates to your operating system.
If one of these services are not running on your computer, there is a high chance that Windows Update would fail no matter what you try doing.
To verify if these services are indeed running on your system, check out the guide below.
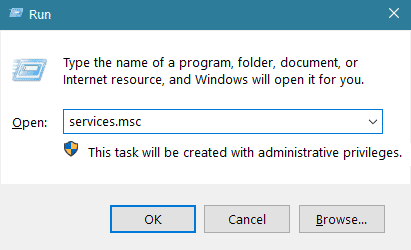
- On your keyboard, press on Windows key + R to open the Run Command Box.
- Now, type services.msc on the text box and click on Ok.
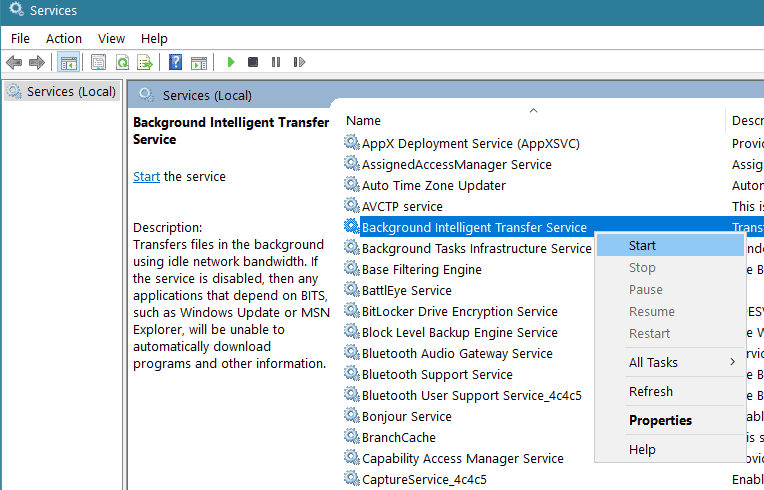
- Lastly, find the following services from the list and make sure that they are running:
Background Intelligent Transfer Service

Windows Update

Workstation
*IMPORTANT NOTES:
- If the status of the service is set to Stopped, click the Start option to activate it.
- If the status of the service is set to Running, click the Restart option to ensure that it is running properly.
Once you are certain that the key services are running on your system, try to run the Windows Update once again to see if the installation process would push through without any problems.
On the other hand, if you are still seeing the error code 0x8024a105 when installing the update on Windows, you can proceed to the next method below to resolve the issue.
7. Rollback Windows Updates.
For the next method, what you can try doing is to roll back the Windows Update a step further. This means that your Windows version would be two updates behind the latest update.
If you are confused as to why you need to do this, here’s a simple explanation.
Possibly, the current version of Windows installed on your system contains a bug or error related to Windows Update installation that causes the update to fail.
In addition, it is also possible that some of your system files got corrupted during use which causes some features like Windows Update to malfunction.
To resolve this, you can try rolling back Windows Updates to restore your system to a point where you are sure that Windows Update is working fine.
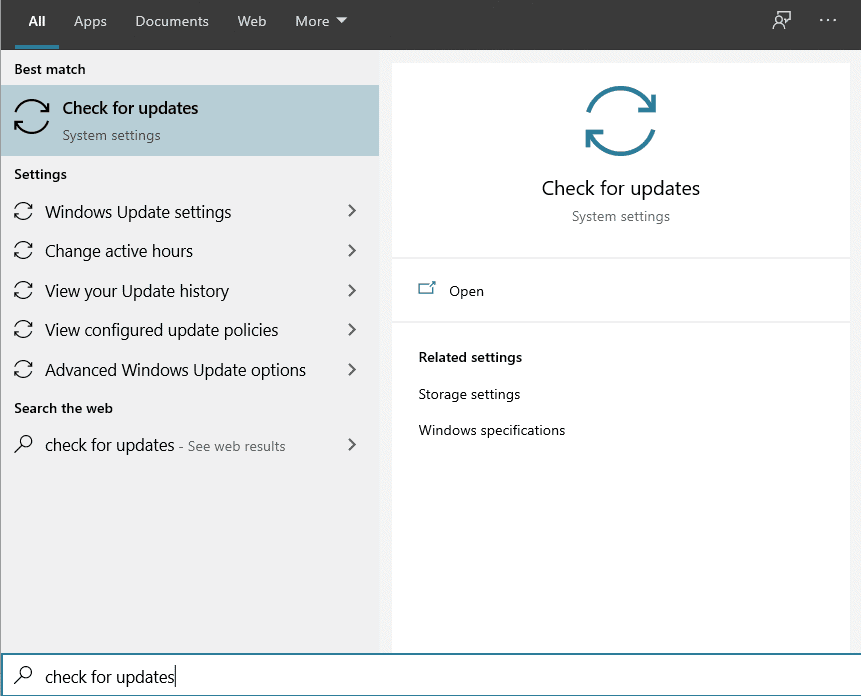
- On your keyboard, press on Windows key + S and search for Check for Updates.
- Next, click on Open to launch it.
- Inside Windows Update, click on View Update History.
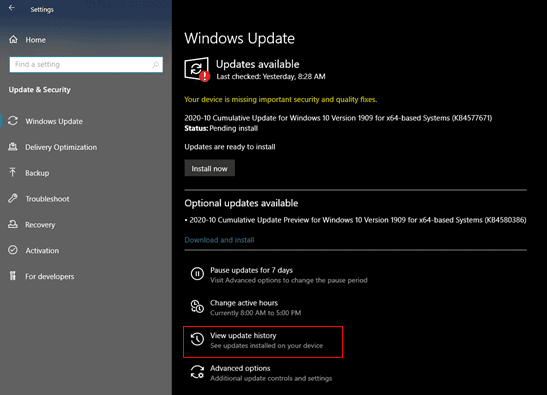
- After that, click on Uninstall Updates.
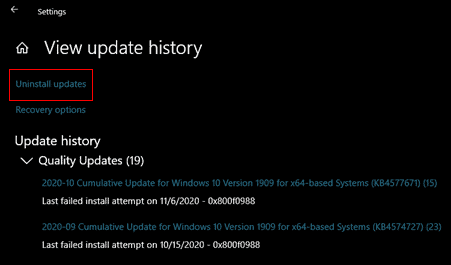
- Now, under the Microsoft Windows tab, click on the first update entry that is available to uninstall. An Uninstall button would appear on the toolbar if it is available for removal.
- Lastly, click on the Uninstall button and follow the on-screen prompts to proceed with the action.

After rolling back Windows Update, restart your computer and download the latest update once again to see if this method worked in fixing the error code 0x8024a105 on your computer.
8. Reinstall Windows.
At this point, this method should be your last resort. If none of the steps above worked in fixing the issue with Windows 10 update, you can try reinstalling Windows on your system.
Doing this would ensure that your system is free from any bugs or glitches. One thing to keep in mind though is that all of your data would be completely erased from your hard drive so be sure to prepare a backup before performing this method.
Also, make sure that you get the latest version of Windows 10 so that you won’t have to update it anymore after installation.
If you don’t know how to install Windows on your system, you can check out our in-depth guide on how to install Windows 10 on solid-state drives which is basically the same with hard drives.
However, if you are not comfortable doing this last method on your own, you can always bring your system to the nearest service center on your location and ask them to install an updated version of Windows 10 to your system.