Having an Asus ROG Strix motherboard, you want to update your BIOS. Your reason may range from you being unable to use newer hardware or maybe you just want to update your BIOS to the newest version. Well, we’re here to help you.
Every Asus ROG Strix series motherboard BIOS can either be updated from the BIOS setup menu using a Flash Drive or directly in Windows through AI Suite. Moreover, some Asus ROG Strix motherboards can also use the BIOS flashback button to update the BIOS.
Of course, updating BIOS doesn’t necessarily make your computer faster, but the security updates that most updates include could never hurt. As such, we will be going through three different methods you could use to update the BIOS of your Asus ROG Strix motherboard.
Updating BIOS Using EZ Flash
The first way of updating the BIOS for the Asus ROG Strix motherboard is by using a USB drive and installing it from the BIOS setup menu using EZ flash. Simply follow the step-by-step instructions below to use this method.
Step #1: Downloading the BIOS File

Before anything else, you need to download the BIOS file itself. To ensure that you get the correct one, we recommend using the official Asus support website.
Type and search your motherboard’s model name, navigate to the latest BIOS file in ‘BIOS and Firmware’, and then select ‘download’.
Step #2: Accessing the BIOS Setup Menu
Once the file is downloaded, extract and copy it to a USB drive. Now that you’re ready to begin updating make sure that your personal and important files are backed up just in case.
Power off the system and plug in your USB. You now need to access the BIOS setup menu. To do so, while the system is powering on, continuously press the ‘delete’ key until the menu loads up.
Step #3: Installing the BIOS Update Using Flash Drive

In the BIOS setup menu, press ‘F7’ to enter advanced mode. From here, select and click the following in order.
- Tools
- Asus EZ Flash 3 Utility
- The USB that has the BIOS file
- The BIOS file itself
- ‘Yes’
When the question of if you really want to update your BIOS comes up, click ‘yes’ once more, and the updating process will start.

Make sure that you, under no circumstances, power the system off or interrupt the updating process. After installation, the system will auto reboot, and that’ll be the end of that!
Updating BIOS in Windows Using AI Suite
The second way of updating BIOS for the Asus ROG Strix motherboard is through the AI Suite interface system. This can be done in Windows itself and doesn’t need you to open the BIOS setup menu. Here’s how you do this:
Step #1: Downloading The BIOS and AI Suite 3

On the official Asus support website, search for your motherboard’s model name and then download both the latest BIOS file from ‘BIOS and Firmware’, as well as AI Suite 3 from ‘Drivers and Tools’.
Step #2: Installing the AI Suite 3
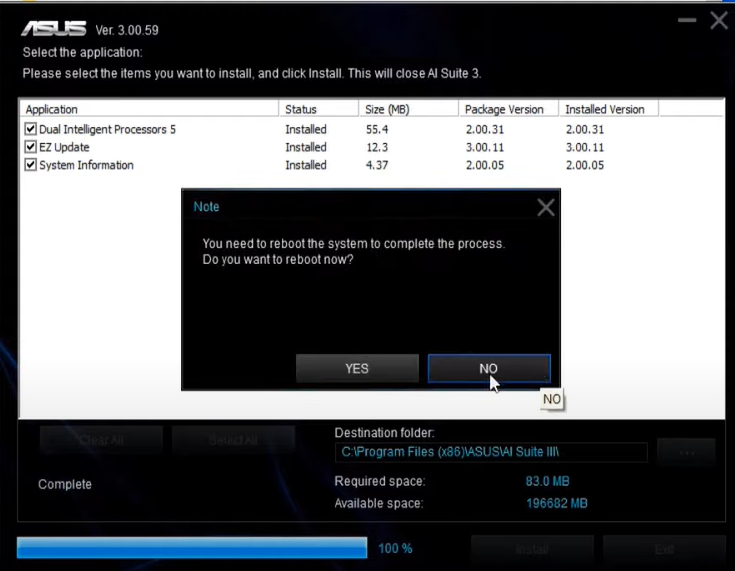
After both files are downloaded, you need to install AI Suite 3. To do so, first, extract the file you just downloaded. When done, open the folder and run ‘AsusSetup.exe’.
Step #3 Updating the BIOS Using AI Suite 3
Now that you’re ready to begin updating make sure that your personal and important files are backed up just in case.
First of all, extract the BIOS file that you downloaded before. When done, find and run the AI Suite 3 utility program that you installed and then select and click the following in order:
- EZ Update
- The downloaded and extracted BIOS file
- Update
- Flash
When the question of if you really want to update your BIOS comes up, click ‘OK’. By doing so, the system will automatically reboot and start the update process.
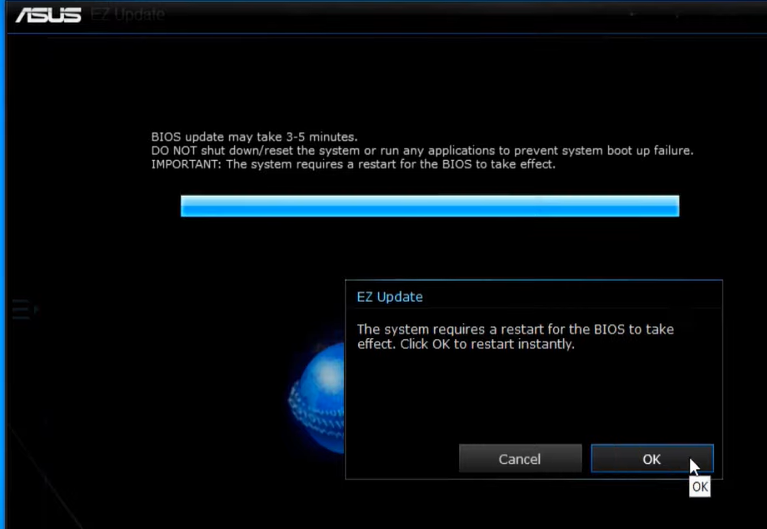
As mentioned before, make sure that you do not disturb or interrupt the installation process, as that might cause issues for your system.
Updating BIOS Using the BIOS Flashback Button
Below is a table showing whether or not the specific Asus ROG Strix motherboard has the BIOS Flashback button feature.
| Model number | BIOS Flashback |
| Asus ROG Strix 690 | Yes |
| Asus ROG Strix 660 | Yes |
| Asus ROG Strix 590 | Yes |
| Asus ROG Strix 570 | Yes |
| Asus ROG Strix 560 | Yes |
| Asus ROG Strix 550 | Yes |
| Asus ROG Strix 490 | Yes |
| Asus ROG Strix 470 | No |
| Asus ROG Strix 450 | Yes |
Note: Some board variants may vary in this regard, so check out the official Asus site to ensure.
If your motherboard specifications state that it has a BIOS Flashback button, then you can update your BIOS without the use of neither the BIOS setup menu nor any Operating System. Here’s how to do it!
Step #1: Downloading the BIOS File
As with the other methods, the first thing you need to do is go to the official Asus support website and search for your motherboard model name. Navigate to the BIOS and Firmware section, and download the latest BIOS file.
Step #2: Make an Executable File of the Update
After the download is complete, extract the file and rename the BIOS file by simply launching the ‘BIOSrenamer.exe’ file that it comes with and then pressing any key. Copy the now renamed BIOS file into a USB drive, making sure that the drive has more than 1GB space and has been formatted to be FAT32.
Step #3: Installing the BIOS Update Using a USB Drive

Step #3: Installing the BIOS Update Using a USB Drive
Now, just power off the system, plug your USB into the USB flashback port and press the BIOS Flashback button until the LED lights start blinking, indicating that the update is installing. When the light stops blinking, the updates will have been done, and it will be safe to power on your system.
Conclusion
To conclude this article, we know it might sometimes be rather technical to update Motherboard BIOS, especially for first-timers. We hope the three methods, as well as the step-by-step instructions for said methods, are enough to make it, so you are able to update your BIOS without any risk or stress.